
AppsToGo is an online service that can be used to run SQL Developer. With AppsToGo, no installation of SQL Developer is required.
Before accessing SQL Developer, you will need to:
- Request access to SQL Developer via AppsToGo. Email [email protected] and request that SQL Developer be added to your AppsToGo
- Install Citrix Workspace on your computer
- Enable mapping on your Google Drive account (if you want to export query results)
For more information about using AppsToGo, please refer to the AppsToGo self-help guide.
Access SQL Developer
- Open a web browser and visit AppsToGo
- Log in with your University of Minnesota Internet ID and Password
- Click SQL Developer [your_version_#]
- If you do not see SQL Developer, please email [email protected] and request it be added to your AppsToGo environment
- If you are using Chrome, a small file will download. Look in the downloads folder and open the file that ends with ".ica". Please refer to the knowledge article AppsToGo: Use Chrome Web Browser
- SQL Developer will open
Log in to the Data Warehouse using SQL Developer
- Double-Click DWEPRD.WORLD in the Connections palette in the left sidebar of SQL Developer.
- When prompted, enter your University of Minnesota Internet ID and password.
- The maximum length of a password for Oracle databases is 25 characters. If your University password is more than 25 characters, you will need to change it so that it is 25 characters or fewer.
- If your account is using Duo, the default authentication will be used.
- The first time you try to log in, the default authentication might not be triggered. If you are not receiving the Duo authentication, use the append mode listed in the Duo Guide to Multi-Factor Authentication to force it.
- If you are still unable to log in, please contact Technology Help for assistance.
Override Your Default Duo Authentication Method
You can override your default authentication by using append mode. For example, you can have Duo call your desk phone instead of sending a push to your mobile device.
- Learn how to use append mode in the Duo Guide to Multi-Factor Authentication
Run or Create a Query in SQL Developer
- A new tab will appear in the workspace where you can enter the query. Type in a new query, or paste in a query.
- Click the green run button in the Query Builder toolbar to execute the query.
- The query results will be displayed at the bottom in the Query Results panel.
- You can copy and paste the results into another application
Browse the Tables and Views in the Data Warehouse
- Right-Click DWEPRD.WORLD in the Connections palette in the left sidebar of SQL Developer
- Select Schema Browser. The schema browser will be displayed, and your name will be selected.
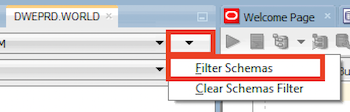
- Click the arrow to the right of the name selector
- Select Filter Schemas. The filter schema dialog is displayed.
- Select Filter Schemas. The filter schema dialog is displayed.
- In the filter box, type DWSYSADM
- Click OK. The DWSYSADM schema is displayed.
- All tables that you have access to are displayed.
- Double-click a table to view information about the table.
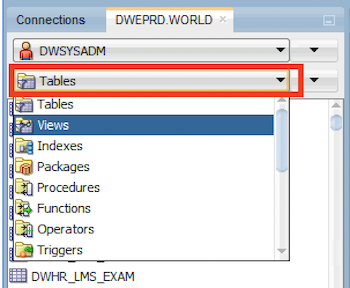
- Click the drop-down beneath DWSYSADM to view other objects -- for example, Views.
Copy Query Results
If there isn't too much data in the results, you can copy/paste the query results into Excel.
- Click any item in the query results panel
- Press CTRL+A (windows) or COMMAND+A (mac) to select all of the data
- Press CTRL+SHIFT+C (windows) or COMMAND+SHIFT+C (mac) to copy all of the data including the headers
- Note: using CTRL+C or COMMAND+C will copy ONLY the data (not the headers)
- Open an Excel Workbook, or a Google Sheet
- Click in the spreadsheet
- Press CTRL+V (windows) or COMMAND+V (mac) to paste the data
Export Query Results
To export the query results, you will need to have enabled mapping on your Google Drive account. You only need to do this once.
- Right-Click (mac: CTRL-Click) on any item in the query results area. A contextual menu is displayed.
- Select Export. The Export Wizard is displayed.
- Choose a format for the exported data.
- Note: when the drop-down list opens, it will be in the middle of the alphabetical list of export formats. Scroll up to find CSV or Excel format
- Depending on the format selected, a set of options will be displayed. They can all be left with the default selections.
- Click the Browse button next to the file location. The Save dialog is displayed.
- Click the Location selector at the top.
- Select Google Drive (I:)
- If you do not see Google Drive in the list of locations, enable mapping on your Google Drive account
- Browse to the location where you want the file saved within your Google Drive account.
- Select Google Drive (I:)
- Enter a File Name
- Click Save. The Save dialog is closed, and the Export Wizard is displayed.
- Click the Location selector at the top.
- Click Next. The Export Summary is displayed.
- Click Finish. The file will be saved to your Google Drive in the location that was specified in step 4 above.