New University-Owned Computer Support Resources
Use this page for self-help guidance to navigate the setup and maintenance of a new University of Minnesota device.
+
First Time Sign-in
Windows: Use Cisco Secure Client First Time Logon to connect to the UMN network, and create your user profile.
Mac: Apple Setup Assistant turns on for new Macs and uses Remote Management to configure and create your user account.
iOS: Apple Setup Assistant turns on for new iPads or iPhones and uses Remote Management to configure and create your user account.
+
Connecting to the Internet
Ethernet:
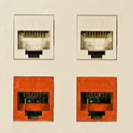
- Desktop devices such as the Dell Latitude will have an Ethernet port on the back. If the room you are setting up the device in has orange ports that look similar to phone jacks, or like the picture below, you can use them to connect to the university network. If the Ethernet jack in your room has not been used in the last six months, it may have been remotely shut down for security purposes. If your device does not automatically connect to the network when plugged into the Ethernet jack, submit a form to reactivate your jack.

- Not all stock laptops have an Ethernet port on the device itself. If a direct ethernet connection is needed, a USB to Ethernet adapter or docking station is required. You can order an adapter from the Technology page of the University of Minnesota Bookstore PunchOut, found on the U Market website.
WiFi:
- To connect your devices to the University’s WiFi network when you are on campus, choose eduroam from your network options. To join, you must enter your full University email address and password. Learn more about eduroam.
When should I use VPN?
- Users who are connected to the University network via an Ethernet cable do not need to use VPN.
- When connected to the University network via WiFi (eduroam) some applications require VPN.
- When working remotely and needing to connect to University resources, websites or applications, you may need to use VPN.
+
Set Up Devices and Peripherals
Setting up a docking station
OIT’s stock Dell WD19S Docking Station is easy to set up, and setup information is available from Dell Support.
- Dell Docking Station WD19S User Guide: Quick Setup of Hardware
- Skip Step 1 to update drivers from Dell.com
Setting up a monitor
OIT’s Stock 27” Hub Monitors are simple to set up and use. A one-page instruction sheet on how to set up the monitor is found on Dell’s website.
You can connect a monitor to your computer or laptop to allow for additional displays
Technology Help can assist you with any hardware setup issues. IT technicians are not authorized to move office equipment such as desks and cabinets. Need a physical desk moved or changed? Contact Facilities management.
+
Software Troubleshooting and Installations
Installing Software:
- You can install software using the management application on your computer to add software.
- Windows: Software Center
- Mac: Self Service
- Note: macOS devices do not come with Microsoft Office pre-installed. You’ll need to install Microsoft Office applications (e.g., Word, Excel, Powerpoint) individually using Self Service.
- Some software may require administrative rights to install and Technology Help can assist you with these. For more information, please review responsible admin rights.
Signing into Applications
- Sign in to Activate Acrobat Pro DC Enterprise License.
- Office 365 for Students, Faculty, and Staff: Troubleshoot Installation and Activation.
- Box Secure Storage: Work with Files and Folders.
- Most other applications will use the UMN Single Sign On (SSO) login process, similar to your UMN email.
Need Additional Software?
- If you need additional software installed on your computer, contact Technology Help.
- You can find out more about software used at the University on Atlas.
+
Connecting to Printers
University-hosted printers are connected and configured on the campus network. These printers can be installed on computers wirelessly when connected to the campus network or eduroam.
- Printers: Install a Network Printer on a macOS Computer
- Printers: Install a Network Printer on a Windows Computer
- HST/AHC: Connect to a Networked Printer
You can connect to a USB printer that’s connected to your device with a cable, too. Find details and instructions for various common printer vendors.
Unable to add your printer?
- If the above steps did not work, or if you receive an error that you need additional permissions, contact Technology Help.
Set your office printer as your device’s default printer.
+
Data Transfer
It is important that user data is securely stored and transferred when getting a new computer, so make sure to carefully backup your data.
Most units will connect to your department’s shared or network folders. If these connections need to be set up manually, use our guide to Connect to a Shared Drive or Network Folder.
The UMN preferred solution for user data is Box for units within the Healthcare Component (also referred to as Health Sciences or HST).
+
Equipment Return and Recycling
When you are finished with your old device that has been replaced, reach out to your supervisor and/or department administrator to determine whether they would like the device recycled or reissued to another employee. When that has been determined, contact Technology Help to coordinate.
If you need any other items recycled, please contact Technology Help.
If you need additional assistance setting up a new University-Owned device, you can note any devices that you wish to recycle when you submit a Device Setup Support request.
Technology Help Options
- Request Support for Setting Up a New Device
Open 24 hours, 7 days a week - Chat
Open 24 hours, 7 days a week - Email: [email protected]
Open 24 hours, 7 days a week - Call: 612-301-4357
Open 24 hours, 7 days a week - Visit a Walk-in Location
Review walk-in locations and hours