
Training Admins and Proxy Enrollers can enroll learners into a section in any course that they administer.
There are three main steps in the Enroll Learners process:
Selecting the course and section
There are two ways to navigate to the enroll learners tool:
- Use the Enroll Learners button on the section roster
- Use the Enroll Learners from the Admin Console
Use the Enroll Learners button on the section roster
- Log in to training.umn.edu
- Select Admin Console.
- Select Manage Courses. The list of courses is displayed.
- Select the Edit button for the course. The edit course form is displayed.
- Select the Edit button for the section. The edit section form is displayed.
- Select the Manage Roster button. The section roster is displayed.
- Select the Enroll Learners at the top of the page. The enroll learners tool is displayed.
Use the Enroll Learners from the Admin Console
- Log in to training.umn.edu
- Select Admin Console.
- Select Enroll Learners.
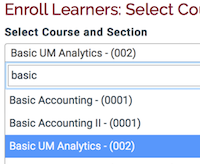
- In the drop-down selector, choose the course and section.
- The list only displays courses that are administered by the training administrator.
- Use the search box at the top of the list to filter the list.
- Click Continue. The Search for Learners form is displayed.
Finding and selecting learners
- Choose how you want to find learners. There are two options for this:

- Find Individual Learners - Use this tab if you are searching for a specific person to enroll.
- Select the Find Individual Learners tab.
- Enter an Internet ID, Last Name, and/or First Name.
- You can type part or all of the First Name or Last Name. For example,: 'mar' ˜johns' will return a list that includes 'Mary Johnson.' More complete information usually yields better results.
- Select the Learner Type (Faculty/Staff, Student, Guest).
Note: If you select Guest, you will need to search by first and/or last name; the Guest search does not allow Internet IDs. - Search. The search results will be displayed at the bottom of the form.
- Enter or Upload Multiple Learners - Use this tab if you have a list of email addresses to enroll.
- Select the Enter or Upload Multiple Learners tab.
- Choose the method to identify your learners.
- Select Enter a list of email addresses. A text area is displayed.
- Type or paste a list of up to 100 email addresses in the text area.
- The list can be separated by commas, semicolons,tabs, whitespaces, or returns.
- Select Upload a file of email addresses
- The file must be in comma separated value (.csv) format.
- There can be up to 100 email addresses.
- All of the email addresses must be in the same column in the csv file.
- The header of the column should be email.
- Select Enter a list of email addresses. A text area is displayed.
- Find Individual Learners - Use this tab if you are searching for a specific person to enroll.
Rules for properly formatting email addresses
- Format email addresses for all University affiliated learners with @umn.edu. Do not use @d.umn.edu, @crk.umn.edu, etc.
- Email addresses must be all lowercase.
- If your list of email addresses is not lowercase, the easiest way to convert them is by using Microsoft Word or Google Docs.
- Paste the emails into Word or Google Docs.
- Highlight the list.
- Microsoft Word: Click the Change Case button on the Home Ribbon. Select Lower.
- Google Docs: Click the Format menu, select Text, select Capitalization, select Lower.
- If your list of email addresses is not lowercase, the easiest way to convert them is by using Microsoft Word or Google Docs.
- Set Enrollment Options. These options let you change the default enrollment settings. This is particularly useful if you are offering recurring training or multiple sections of the same course.
- Allow enrollment for learners who are currently enrolled in other sections of this course?
- By default, learners enrolled in other sections will not be available to enroll.
- Check this box to override the default and enroll a learner who is already enrolled in other sections of the same course.
- Exclude learners who have already completed a different section of this course within the timeframe below:
- By default, learners will be available to enroll in the selected section even if they have recently completed a different section of the same course.
- Check this box to override the default and exclude recently completed learners. Use the Months drop-down to specify how recent the completion should be.
Note: The Months drop-down works relative to today. For example, if today is 5/14/2019, and you set the drop down to Months: 3, then learners who have completed any section of the course since 2/14/2019 will not be available to enroll.
- Click Display Results. The search results are displayed at the bottom of the screen, in the Select Learners section of the form.
- Review and select learners to enroll.
- On the Available to Enroll tab, use the check boxes or the Select All button to select the learner(s) you wish to enroll.
- You may want to review the Unavailable to Enroll tab and modify your Enrollment Options (Step 2) if necessary.
- Click Continue. The Complete Enrollment page is displayed.
- Allow enrollment for learners who are currently enrolled in other sections of this course?
Completing enrollment
- Set Enrollment Options
- Require this training for these learners
- The training will be marked "Required" on the learner's transcript.
- You will be able to set a due date.
- The learner will not be able to withdraw.
- Due Date
- The due date will display on the learner's transcript.
- The default Training Due notification email will be sent to the learner 2 weeks before the due date.
- Enrollment Confirmation
You can choose whether or not to send an Enrollment Confirmation email.
- Require this training for these learners
- If necessary, address maximum capacity. If the section has already reached its maximum capacity, you will need to choose one of these options:
- Override maximum capacity and enroll learners
- This option is available only to Training Admins, not Proxy Enrollers
- The maximum enrollment will not change. For example, if the maximum is 10 learners and the override is chosen, the section will still have 10 as the maximum and there will be 11 enrolled.
- Add learners to waitlist
This will add the learner to the end of the waitlist. For example, if there were 3 learners on the waitlist, the newly added learner will be in position 4.
- Override maximum capacity and enroll learners
- Click Enroll Learners in Training. The learner(s) are enrolled and the Admin Console is displayed with a confirmation at the top of the page.
Completing enrollment for learners with guest or sponsored accounts
The following directions ensure that learners with Guest or Sponsored accounts are correctly enrolled in the courses you administer. Whenever you enroll a learner with a guest or sponsored account into a Training Hub course, you will then need to manually add them to the Canvas course as well.
- Follow the usual enrollment process in Training Hub
2. Open the related Canvas course
3. Select the People menu item within that course
4. Select the + People button
5. Enter the learner's email address
6. Select Next
7. Confirm the enrollment
If you are trying to enroll someone through Training Hub and it is not working, contact [email protected].
- Follow the usual enrollment process in Training Hub