
Creating sections in Training Hub is a simple process. First you must enter the course information (see Creating a New Course). The sections are added to the course.
View a short 6-minute video to see an overview of creating a new course (including sections).
Find the course
- Log in to the Training Hub.
- Click the Admin Console button.
- In the Training Administration Resources section, click Courses.
- Locate the course in the list of all courses.
- Click Edit. The Edit Course form is displayed.
Create a new section
- Click the Add Section button.
- Enter a Section Number
- Maximum 20 characters (letters, numbers, punctuation)
- Click Save and Continue. The full section form is displayed.
- Check the box(es) for one or more delivery method
- If Instructor-led Training (ILT) is selected:
- Choose a Completion Method
- Select a Start Date
- Select an End Date
- Enter a Location
- If Canvas is selected
- Choose a Completion Method
- If the Course Section will have more than 10,000 learners enrolled, select the checkbox labeled This course section will have more than 10,000 learners...
- This will create 5 Canvas course sites that are associated with this Training Hub section. Refer to the article Configure Canvas Based Section for Large Number of Enrollments
- Note: when the new section form is saved, the Canvas course site will be created. See How to locate your Training Hub course site
- If Other Online Source (e.g., YouTube) is selected
- Choose a Completion Method
- Enter the URL for the online source
- If Instructor-led Training (ILT) is selected:
Configure optional settings for the section
Add instructor
If the section has an instructor
- Click Add Instructor. The Search for Users page is displayed.
- Enter an Internet ID, First Name, and/or Last Name.
- Click Search.
- Locate the person in the table of results and click Make Instructor.
- Click OK to confirm the selection. The Edit Section page is displayed.
Set capacity
Sections will allow unlimited enrollment by default. The capacity options allow you to set a maximum enrollment for the section, and if set, you can choose to allow a waitlist.
- Enter the number in the Maximum Enrollment field (If the section has a maximum enrollment).
- Click the checkbox to enable Allow Waitlist (If the course should have a waitlist).
Enable self-enrollment options
If learners should be able to find the course in the Training Hub Catalog and enroll in the section, use these options:
- Select one of the Self-Enrollment Options
- Allow self enrollment for active employees only
- This will allow any person that has an active job row in PeopleSoft to enroll in the course
- Allow self enrollment for anyone with a University of Minnesota login (employees, students, guests, etc.)
- Allow self enrollment for active employees only
- Enter a Self-Enrollment Start Date.
- If blank, the start date is when the section is open and the course is active.
- Enter a Self-Enrollment End Date.
- If blank, enrollment is available while the section is open and the course is active.
- However, if the section is Instructor-led Training, enrollment will end on the ILT start date.
Set notifications
Each section will have a set of default notifications. You can add, edit or remove the notifications for the section. You can have multiple notifications for the triggers ILT Start Date and Traiing Due Date. The other notifications can only have one instance of each. For more information on notifications, please see the articles Default Section Notifications and Create, Edit, Remove Section Notifications.
Select a section status
Select a Status for the section.
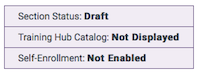
- Draft - the initial state of a section when first created
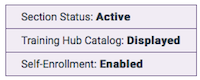
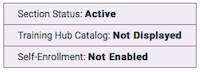
- Active - Learners can be enrolled in the section. When you choose this status, you will have an option to have the display the section in the Training Hub catalog.
- Retired - Learners cannot be enrolled in the section
- Cancelled - Any enrolled learners will receive the Cancelled Section notification
Save the section
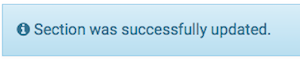
- Click Update Course Section. A confirmation that the section has been successfully created is be displayed at the top of the page. You may also see a reminder if your course is not Active that you must make your course Active in order for learners to self-enroll.
The top of the create/edit section form also displays the course status. Here are some examples of different states:
- Click Back to Course. The course page is displayed, and the section appears in the Sections table.