
Round Robin Assignments allow you to assign which staff are going to be actively getting Cases associated with a particular Assignment Group.
Managing Round Robin Assignments
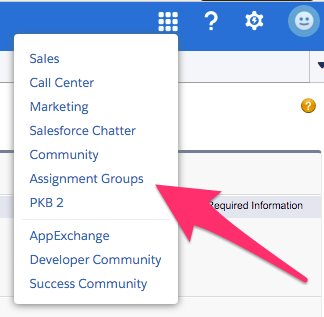
- Expand the App Menu and select Assignment Groups from the list. This brings up the Assignment Groups App.
- Once on the Assignment Groups App click on the Assignment Groups Tab if needed.

- Once on the Assignment Groups Tab if you are not seeing the desired Assignment Group in your default View use the View:All menu and click Go! to get it to show in the list.

- Once visible click on the Group Name to bring up the Assignment Group record.

- On the Assignment Group record the last section is Group Members and a list of up to 5 available Group Members will be showing with a Status of either Green (active) or Red (not active). If the User you are trying to modify is not showing by default click on Go to list at the bottom to see all Users.

- Once the User you're trying to modify is showing in the list click on Edit in the Action column. This brings up the Group Member Edit screen.

- From the Group Member Edit screen use the Active dropdown to select either True to make the User Active or False to make the user Not Active.

- Once you have made the desired changes click on Save to be brought back to the last screen you were on.
