
Follow the recommendations below to keep your Zoom Meetings secure and free from disruption. For specific guidance about teaching online using Zoom, see Zoom: Teach Online Class Sessions.
In this Article
- Maintaining the Code of Conduct
- Before a Meeting: Adjusting Your Settings for More Secure Meeting
- Video: Global Settings to Secure Your Zoom Meetings (3:33)
- Adjusting Your Settings When Scheduling Individual Meetings
- Securing a Meeting in Progress
- Video: In-Meeting Tools to Secure Your Zoom Meetings (3:15)
- After a Meeting
Maintaining the Code of Conduct
Remind students that:
- The Student Conduct Code applies in a digital space.
- Disruptive behavior (including sharing a meeting ID for the purpose of disruption) will be reported through the Office for Community Standards.
- The University's Teaching and Learning: Student Responsibilities policy prohibits students from making their own recordings of course sessions.
Before a Meeting: Adjusting Your Settings for a More Secure Meeting
For a video version of these instructions, see Settings to Secure Your Zoom Meetings (3:33).
Account Settings apply to all of your Zoom Meetings. To adjust your Zoom Account settings, sign into umn.zoom.us and from the left navigation menu select Settings.
The settings screen contains a list of defaults, which you can adjust to customize your meeting settings. Below are options that may be most effective in securing your meetings.
Note: Settings that are grayed out are locked for the entire University system. These settings have been determined by policy, security, and technology experts.
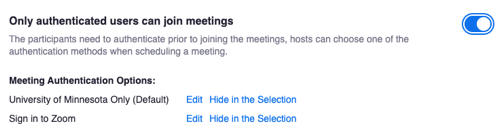
Only authenticated users can join meetings
Recommendation: Toggle On for high security, unless you are explicitly including a participant, such as a guest speaker, from outside the University of Minnesota. As an alternative, you can enable the Waiting Room feature before or during your meeting.
When you toggle this setting On, you will be presented with two authentication options:
- University of Minnesota Only (Default): If you intend to have only UMN participants in your Zoom meetings, this option prevents external participants. Participants must sign in using their University of Minnesota credentials. This option includes all UMN campuses.
- Notes:
- Do not use this method if you intend to host visitors who don't have University of Minnesota accounts, such as guest speakers. You can modify this setting when scheduling an individual meeting if you plan to have a guest account joining.
- If a participant is unable to join the meeting, make sure they are signed into their Zoom account using their UMN credentials.
- If you are in the HCC/BAA and need to attend or host a meeting that requires authentication:
- You are required to complete a brief training about HCC requirements in order to be able to sign in and access the meeting.
- After training is complete it can take up to one hour before you can log in.
- Log in to umn.zoom.us to initialize your HCC Zoom account.
- If you had an account on non-hcc zoom it will prompt you to transfer your account. Accept the change and check your email to verify the change.
- Notes:
- Sign in to Zoom: This option requires that everyone joining your Zoom meeting must be logged into a valid Zoom account from any institution or Free Zoom account. This option is good if you are working with other institutions that also use Zoom beyond the University of Minnesota.
Annotation
Recommendation: Toggle Off.
The Annotation tool allows participants to draw on a shared screen. While this can be useful, it can be used in disruptive ways. It is also inaccessible to people using screen readers.

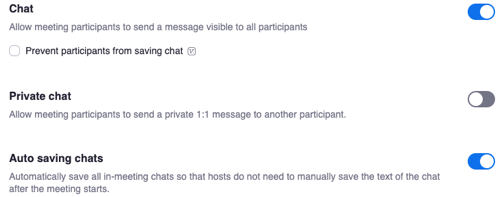
Chat
Recommendation: Toggle on auto saving of chat transcripts for host.
There are three chat-related options in Zoom settings:
- Allow meeting participants to send a message visible to all participants: Public chat can be useful for collecting feedback or facilitating discussion. It is up to the host to decide whether to allow participants to use chat features. Using a co-host or moderator for chat is recommended to manage questions and look for disruptions.
- (optional) Prevent participants from saving chat: Toggling this setting on allows participants to read chat, but they cannot copy chat text or save the chat for future use. Checking this option also prevents the host from auto-saving chats.
- Private chat: Allow participants to send private messages to each other and the host. Only the two participants in a private chat can see their conversation; the host does not have access to participants' private chat. Disabling private chat can help reduce inappropriate or disruptive communications.
- Auto saving chats: Enabling this setting only applies to you as a host of a Zoom meeting. The chat transcript is helpful if you need to address behavioral issues.
While you can set your preferred chat settings at umn.zoom.us, chat settings can also be adjusted on a meeting-by-meeting basis see: How to control chat access during the meeting.
Screen Sharing
Recommendation: Toggle to Host Only for added security.
You can modify Screen Sharing to prevent non-host participants from sharing their screens.
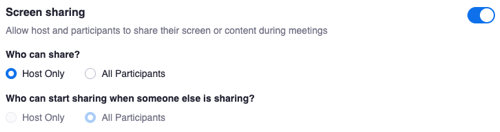
You can enable or disable screen sharing for participants using the Security button in the meeting.
Allow Removed Participants to Rejoin
Recommendation: Toggle Off.
![]()
Disabling this setting ensures that participants removed from meetings cannot rejoin the meeting. If you are not using an authenticated meeting, the user may be able to rejoin using a different device or alias.
Adjusting Your Settings When Scheduling Individual Meetings
You can select your settings when you schedule an individual meeting from the Meetings tab at umn.zoom.us.
Note: The available options are different when creating meetings inside the Zoom for Canvas Integration. If you create a meeting inside Canvas, you can visit umn.zoom.us to adjust meeting settings later.
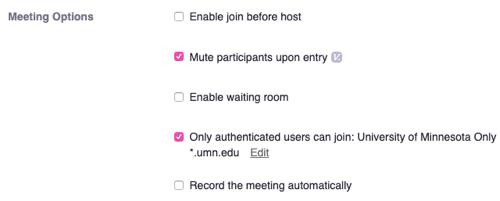
Only authenticated users can join
Recommendation: Toggle On for high security, unless you are explicitly including a participant from outside the University of Minnesota, such as a guest speaker.
This setting behaves the same as Only authenticated users can join in the Account settings described above.
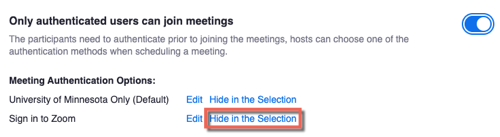
Note: If you check the box and Sign into Zoom appears:
- Go to Settings
- Find the setting Only authenticated user can join meetings
- Next to Sign into Zoom, select Hide in the Selection
Join Before Host
Recommendation: Toggle off to prevent participants from accessing the meeting without you.

Disabling this setting prevents participants from joining the meeting and interacting before the host arrives. Participants receive a notification that they are signed into the meeting but must wait until the host enters the meeting.
Enable waiting room
Recommendation: Use this option as a temporary solution if you're experiencing disruptive behavior or to add an additional layer of security.
You can use the waiting room to screen participants before entry into the meeting. This requires you to allow each participant into the meeting, rather than granting them automatic entry. Participants receive a notification that they are in the waiting room until the host grants entry.
Note: Enabling this setting automatically disables Join before host.
Securing a Meeting in Progress
For a video version of these instructions, see Video: In-Meeting Tools to Secure Your Zoom Meetings (1:31).
In addition to the global and per-meeting settings, there are things you can do during a meeting to keep it secure. Zoom has added a Security icon to the host and co-host's control bar within meetings.

The Security menu contains several options to quickly and efficiently secure your meeting.
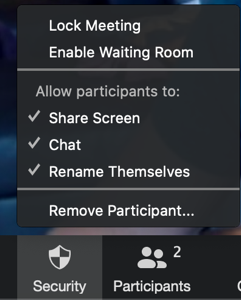
Lock Meeting
Recommendation: Use for secure meeting groups or immediately disruptive situations only.
Selecting the Security button opens a menu with the option to lock and unlock your meeting. Locking your meeting prevents further participants from joining. If a participant is late or disconnects, they won't be able to rejoin unless you unlock the meeting.
Enable waiting room
Recommendation: Use this option as a temporary solution if you're experiencing disruptive behavior or to add an additional layer of security.
Selecting the Security button opens a menu with the option to Enable Waiting Room.
You can use the waiting room to screen participants before entry into the meeting. This requires you to allow each participant into the meeting, rather than granting them automatic entry. Participants receive a notification that they are in the waiting room until the host grants entry.
Restricting Screen Share
To quickly stop participants from sharing their screen within your meeting, use the Security button in the host's control bar to uncheck Screen Share.
Chat Settings
Recommendation: Select the option you are most comfortable with. To quickly disable chat in your meeting, select the Security button and uncheck the chat option.
After selecting the chat icon, choose the button with an ellipsis (...) to change the chat settings for your meeting. Participants Can Chat With: