
AppsToGo: Use UMN Apps on Your Personal Device
This guide walks you through how to gain access to virtual apps available through AppsToGo, the University of Minnesota's Application Delivery Infastructure. AppsToGo apps are available to students in the College of Science and Engineering and to students who are enrolled in a course that uses AppsToGo. Software used on AppsToGo is for instructional needs only; it is not available for research needs.
Gain Access and Use AppsToGo
Learn About AppsToGo
AppsToGo is a client virtualization service that allows you to use certain discipline-specific software (Apps) on your desktop, laptop or mobile device. AppsToGo is available for students who access specific computer labs or are enrolled in classes that use this service.
The following pages will explain if you have access to AppsToGo, how to set up your computer or device to use AppsToGo and how to save files generated within an App.
If you are a faculty member who would like to offer this service to your students for a specific class, please fill out the AppsToGo Request Form.
Security
By default, AppsToGo is designed to be secure and is password protected. It is recommended to save your work files to Google Drive or network-attached drive. Please ensure that wherever you save your files, they are secured and backed up.
Privacy
AppsToGo fully complies with FERPA* privacy policies.
*To the extent the University generates or maintains educational records related to accessing and using AppsToGo under this Agreement, the University will comply with the Family Educational Rights and Privacy Act (FERPA) and shall limit access to only those school officials with a legitimate educational interest. Student data at the University of Minnesota is governed by FERPA (Family Educational Rights and Privacy Act). Student educational records are private student data with the exception of directory information. Among other things, this law enables students to suppress some or all of their directory information, such as their Internet IDs and email addresses. Students who do not agree to sharing this information with University staff for the purpose of gaining access to AppsToGo may be denied use of AppsToGo. For example, AppsToGo access rules may require student ID's to be put in an Active Directory group linked to the course they are enrolled in. For more information, read the student guide to FERPA at OneStop.
Before using Apps and Desktops through AppsToGo to complete coursework, be sure you understand the following considerations to successfully use Apps for assignment completion.
Assignment Considerations
- To prevent data loss due to inactivity timeouts, sessions should not be left idle or disconnected with unsaved work. Batch queuing is not supported.
- Application licenses are on a first-come, first-served basis. Most Apps have restrictions on how many users can be accessing the app at the same time. For that reason, there is a possibility of apps being unavailable during peak work times.
- In general, AppsToGo behaves like a public computer in a lab. Work must be saved to a Google Drive or network share as it will not be retained after logging off the AppsToGo session.
AppsToGo Availability Considerations
- AppsToGo is available 24/7 except for during the routine maintenance period -- every Sunday from 3am - 6am.
- AppsToGo is rebooted during the routine maintenance period. If you are using AppsToGo during this time, you will receive a message asking you to save your work and log off. Please do so because any work that is unsaved will be lost when AppsToGo reboots.
Access AppsToGo
This article links to instructions for downloading and installing Citrix Workspace (formerly, Citrix Receiver) on UMN-managed and personally-owned devices. Choose the link below to install the Citrix Workspace for your specific operating system. You only need to install Citrix Workspace once.
In this article:
-
- Install Citrix Workspace on Your UMN-Managed Device
Install Citrix Workspace on Your Personally-Owned Device
NOTE: While installing, if you receive a pop-up message that asks if you want to set up a Citrix account you can select No.
Windows and macOS Devices
Visit the Citrix website to download and install the latest version of Workspace.
- Note: The website may open to show the first download link option as a restricted link that requires sign in. If so, disregard that link and look for the relevant Windows or Mac section to find the most recent download for your device. It may ask you to agree to the End-User License Agreement to download, but it will not require you to sign in.
iOS Devices
Open the Apple App Store and search for Citrix Workspace to download and install the latest version.
ChromeOS / Chromebook Devices
Open the Chrome Web Store and search for Citrix Workspace to download and install the app to your Chromebook.
NOTE: Use the Citrix Workspace App to access AppsToGo, NOT your web browser. If the .ica file does not launch automatically, double-click on it and it launches fine then.
Android Devices
Open the Google Play Store and search for Citrix Workspace to download and install the latest version.
All Other Devices
Please visit Citrix to find the version of Workspace that is supported on your platform.
Please note not all platforms are publicly available. If you need Workspace for a platform other than what is listed above, and that requires a sign-in, please email [email protected]
Install Citrix Workspace on Your UMN-Managed Device
Windows Devices
- In your Windows search bar, search for Software Center
- Open Software Center

- Search for Citrix Workspace
- Click on and install Citrix Workspace.
Note: If you are having problems opening Software Center or do not see Citrix Workspace available, contact Technology Help.
chromeOS / Chromebook Devices
- Open the Chrome Web Store
- Search for Citrix Workspace
- Download and install the app to your Chromebook
Note: Use the Citrix Workspace App to access AppsToGo, NOT your web browser.
macOS or iOS Devices
Open Self Service, click on and install Citrix Workspace.
If you are having problems opening Self Service or do not see Citrix Workspace available, contact Technology Help.
Need Help?
Please contact University of Minnesota Technology Help.
Mapping your Google Drive to the AppsToGo environment will be done using the Google Drive Desktop application. To enable the Drive mapping, you will first need to authenticate to the Google Drive Desktop application as described below.
Enabling Google Drive Mapping
- Upon launching a virtual application or desktop from AppsToGo you will be prompted to Sign in to Google Drive. Select the Sign in with browser button to be redirected to web logon.

- Note: It may take a minute for this automatic prompt to appear. If you are logging in to a virtual desktop you can also launch Google Drive from the Windows Start Menu.
- Enter your University email address at the prompt and select Next. The authentication screen brings you to the University's Single Sign-On portal.

- Enter your University Internet ID and password and select Sign In. You will be prompted to complete Duo multi-factor authentication.
- Authenticate with Duo to complete the sign-in process.
- Select Sign In when prompted.

- You will receive a Success! message stating that you have completed the Google Drive mapping.

- Once you authenticate the Google Drive will be mapped to your environment most likely as the G Drive and will be labeled Google Drive.

Note: The authentication prompt will re-appear periodically depending upon password resets and vendor timeouts.
This article describes how to log in to AppsToGo and access Apps after you have completed Step 1: Install Citrix Workspace (formerly Receiver) and Step 2: Link Your Google Drive in the AppsToGo Self-Help Guide.
Logging In and Accessing Apps
- In a web browser such as Firefox or Safari, go to AppsToGo. (Chrome Web Browsers, ChromeOS and Chromebook users please refer to AppsToGo: Using Chrome Web Browsers.)

- Log in with your internet ID and password. You will be brought to your Home page where all the apps you have access to and have favorited are listed.
- If you are asked to trust any certificates, accept and trust them.
- If you cannot log in, please wait 24 hours or until you receive an email stating you have access.
- Note: You may have issues logging into AppsToGo if your password uses an underscore, parenthesis, or extra space as special character.

- To access to a desktop, click on the Desktops icon.

- To access an app. click on the icon for the app and it will launch the Citrix Workspace application and open the App. (If you are using Chrome and a file with the suffix ".ica" is downloaded, please see the instructions at AppsToGo: Using Chrome Web Browser.)

- When you are finished, quit the App as you would a normal Windows application.
- To log out of AppsToGo, click on the gear icon
 at the top of the window, and choose Log Off.

Notes
- It is important to always quit the Apps and Log Off when you are finished working. If you do not Log Off, your session remains active for 30 minutes before it times out. Please Log Off every time to allow other students to use AppsToGo.
- The next time you log on to AppsToGo, you will be brought back to your Favorites.
- Save all work to your connected drive of choice by following the instructions in AppsToGo: Saving Your Work. Be sure that you have completed the one-time enable mapping on your Google Drive. Do NOT save files to your desktop unless instructed. They will not be there the next time you log in.
Linux User Notes
Some Linux users have reported issues when trying to open Ubuntu. Follow these steps for help:
- In the CMD window, enter the following commands
cd/opt/Citrix/ICAClient/keystore/sudo rm -rf cacertssudo In -s /etc/ssl/certs cacerts
- Disable ipv6 in the config files.
- Reboot and try opening Ubuntu again.
Additional Information
- If you launch an App using the Citrix Workspace application that you downloaded and installed, you may need to input the following information:
- Server address: https://apps.umn.edu OR ad.umn.edu
- Log in as: AD\first_part_of_email_address Example: AD\name001
- When you launch an application for the first time, Citrix Workspace may prompt access to your local hard drives. If you want this option to save your work directly to the computer you are accessing apps.umn.edu from, you will need to Permit access.

Use AppsToGo
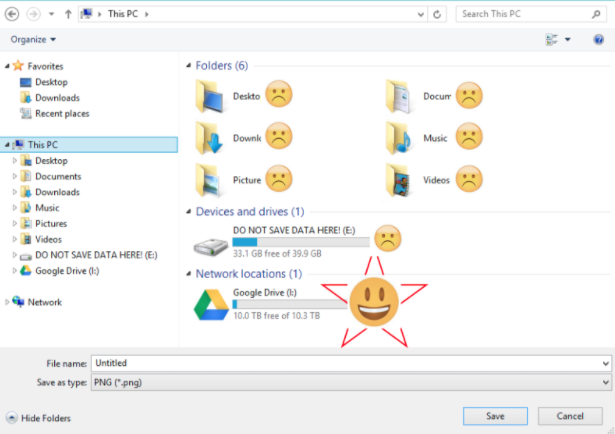
All AppsToGo apps and desktops run from a virtual server. The virtual server looks like a real computer, but the drives don't save data. Data saved to a virtual server's "internal" drives will be erased when you log off and the virtual server is rebooted. Be sure to always save your work outside of the virtual server.
Saving Your Work
Where you can save files will depend on the app or desktop you are using.
- Google Drive: To have your Google Drive connect to your AppsToGo session, enable mapping on your Google Drive so that you can save your work to Google Drive. After this one-time registration, your device will automatically connect your Google Drive when you launch an AppsToGo App. There is no cost for this registration.
- Network Drive: Some applications don't work well when reading or writing data to a Google Drive. In this case you may find that your network drive works better. Colleges that offer students a network drive will generally have them mapped to AppsToGo.
AppsToGo app and desktop sessions are temporary unless you are instructed otherwise. You are responsible for saving your work to your Google Drive or mapped network drive, just as you would in a public or college computer lab.
The first page you see after logging on to AppsToGo is your Home. All apps that you have access to show up in your Favorites by default.
Removing an App from Your AppsToGo Favorites
- Click the star icon next to the App you wish to remove.

- The button will star icon will change to an empty star.

- If you re-load the page, the application no longer appears in your Favorites.

Adding an App to Your Apps To Go Favorites
- Click on the Apps icon at the top of the page.

- Click the star icon next to the app you want to add to your Favorites.

- Click the Home icon at the top of the screen. The app is now in your Favorites.

When you use AppsToGo, you have many choices of where to save (or print) your work. These instructions will guide you through how to turn off the ability to save files to your computer's local hard drive.
Use these instructions if you want to prevent the accidental saving of files to your computer's local hard drive or printing from your computer's local printers when using AppsToGo. Following these instructions will not affect the ability to save to your mapped network drive (or your Google Drive). These instructions may be reversed at any time.
The first time you log on to AppsToGo, CitrixWorkspace (or Citrix Receiver) will display asking if you want to allow access to your local hard drive. The dialogue box will be similar to the one below.
Your choices will be:
- No access
- Read-only access
- Read/write access
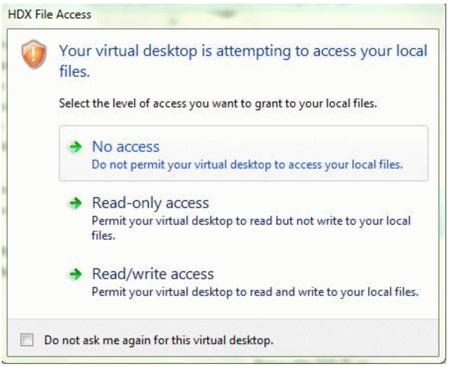
At this point you may choose what level of access you would like to allow.
You may disable your user-level account's access to your local hard drive at any time by modifying the preference within the Citrix Workspace (or Citrix Receiver) application. Changing access to local hard drives on the computer's system-level requires the manual modification of the .ini preference file for Citrix Workspace (or Citrix Receiver). For instructions, see below.
Note these things in regards to changing Citrix Workspace (or Citrix Receiver) preferences on Windows and Mac OS X:
- Changes take effect after quitting and relaunching Citrix Workspace (or Citrix Receiver).
- If you disable access to your local hard drive, your local hard drive may still show up in the sidebar of the application, however, you will receive an error message if you try to access it.
Disable access to client hard drive (MAC OS X)
- Open Citrix Workspace (or Citrix Receiver).
- In the application toolbar, select Citrix Workspace (or Citrix Receiver) and click on Preferences.
- Click on the File Access icon.
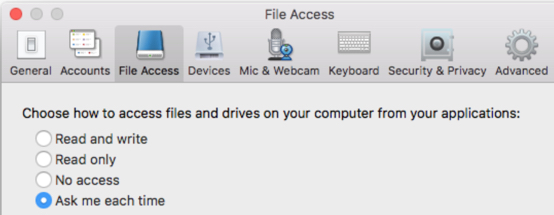
- Click the No access selection to disable access.
- Close the Citrix Workspace (or Citrix Receiver).
Disable access to the computer's local hard drive for one virtual app/desktop (Windows machine)
- Go to apps.umn.edu using a supported web browser (see the Self-Help Guide).
- Launch any AppsToGo application/desktop.
- Right-click on the Citrix Workspace (or Citrix Receiver) Icon
 in the Windows notification area at the bottom of your screen (you may have to unhide your notifications to see the Citrix Workspace (or Citrix Receiver) Icon).
 - Click Connection Center; click Preferences.
- Under the File Access tab, you will see some options to choose. To disable access until further notice, select No Access.
- Click Apply, and then click OK to close out of the preferences area.
- Click Close to get out of the Citrix Connection Center.
Note: For individual Windows Published desktops the drive settings are located in the Preferences Dialog and can be accessed via the toolbar at the top of the screen.
Disable access to Windows hard drives and printers on a Windows client computer for all virtual applications and/or desktops
NOTE: Disabling local client drive access globally requires manually editing the Citrix Workspace (or Citrix Receiver) configuration file on the client's computer. Therefore, these steps can only be followed on a device that you have admin access to (eg. not UMN managed devices).
- Log out of your AppsToGo session and quit Citrix Workspace (or Citrix Receiver).
- Search documents: appsrv.ini
- Click Search in File Explorer
- Find the APPSRV.INI file ( in %APPDATA%\ICACLIENT ).
- Run: notepad.exe %APPDATA%\ICACLIENT\APPSRV.INI
- In notepad, find these lines and change them all to off:
- COMAllowed=off
- CPMAllowed=off
- VSLAllowed=off
- CDMAllowed=off
- Click Save.
- Quit Notepad.
Definition of variables listed above:
- COMAllowed=on/off - set CLIENT COM Port mapping
- CPMAllowed=on/off - set CLIENT LPT Port mapping
- VSLAllowed=on/off - set CLIENT PRINTER mapping
- CDMAllowed=on/off - set CLIENT DRIVE mapping