The Service Console within Enterprise CRM is a way of looking at and organizing information. Some of the navigation elements are not always clear.
The below outlines some ways to manipulate and navigate the information you may be seeing when you log into the tool for the first time. It also shows you how to move elements around in order to optimize your view of what you may be working on within the tool.
Removing the Interaction Log
When you first log into the Service Console, or when navigating to certain records, you may see a box at the bottom of your screen called an Interaction Log. Most of the time you will not want this taking up the bottom of your screen.
To remove the Interaction Log hover over the middle of the line at the top of the box separating it from the other page elements (depending on your screen resolution this is usually somewhere above the Save Log button) until you get a box with a downward pointing arrow.

Click on this arrow to minimize the Interaction Log and remove it from your view.
Using Tabs
The Service Console uses a Tab structure, similar to what you would see on most modern web browsers, that allows you to have multiple records open at once. In addition to Primary Tabs that allow you to have multiple records open at once, the Service Console allows you to have subtabs with associated records open within a single tab.
For example, the screenshot below shows a Case and a Contact open as Primary tabs, and three subtabs open on the shown Contact record.

- Hovering over the Primary tab or subtab will bring up a circled X button that allows you to close the tab or subtab.
- To add more tabs clicking on the + button at the end of the tab or subtab list will give you an option for entering a Salesforce URL and clicking Go! to add that tab or subtab to your view.
- The button at the end of the tab or subtab bar will bring up a menu with options to get links for different tabs that may be open and options to refresh some or all open tabs or subtabs.
- Tabs can be moved by clicked and dragging tabs to desired locations.
- Note: This will only work within the same bar, i.e. moving a subtab within the subtab bar is possible but you cannot move a subtab into the tab bar using this method.
Removing or Adding the Highlights Panel
At the top of Contact records there is a Highlights Panel that contains some easy to scan information about the Contact record you are on. By default this will be showing but you may not always want to see that information at the top of your screen.
To remove the Highlights Panel use your mouse to hover over the line between the Highlights Panel and the Contact Details until the bar is a darker color gray and double-click it to minimize the panel.

If you want the Highlights panel back or you minimized it accidentally you may want to open the Highlights panel again. To do this hover over the top of the screen on the Contact record, right below the bar with your open tabs listed, until the bar becomes highlighted and you get a box with a downward facing arrow in the middle.

Clicking on that box will bring the Highlights Panel back out at the top of your screen.
Removing or Adding the Left Side Panel
When on a Case record you may be seeing a Left Side Panel that, depending on your particular setup and available information within Peoplesoft, may or may not be showing additional information. By default this will be showing but you may not want to see it for a time and/or if your department isn't using that functionality you may want to remove it from your view forever.
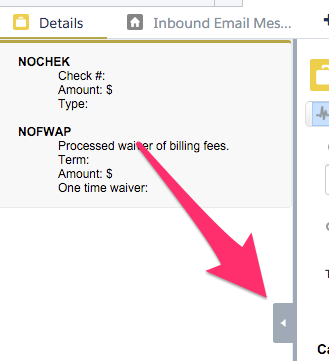
To remove the Left Side Panel use your mouse to hover over the line between the Left Side Panel and the Case until you get a box with an arrow pointing left. Click on that box to remove the Left Side Panel from your view.

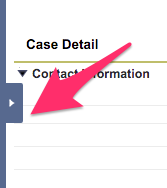
If you want the Left Side Panel back or you minimized it accidentally you may want to open the Left Side Panel again. To do this hover over the left side of the screen on the Case record until you get a dark gray bar with a box in the middle with an arrow pointing right. Click on that box to add the Left Side Panel back to your view.

