Audience: Faculty, Staff and Students
As part of Kaltura in Canvas, the Media Gallery is a tool to publish, view, and search media (video and audio recordings). The Media Gallery appears in each Canvas course, unless it is hidden.
- Only people enrolled in the Canvas course have access to that course's Media Gallery.
- The Media Gallery appears in Canvas courses. Teachers, designers, and teaching assistants (TAs) in Canvas courses can follow these steps to re-add, move, or remove the Media Gallery.
- When media added to the Media Gallery has captions, the caption text is searchable. This allows people in the course to find specific passages within media using their own search terms - a feature that is useful for content review. Learn more at Canvas: View and Search Video Contents in the Media Gallery
In this article:
- Roles in Canvas
- Adding Media to the Media Gallery
- Removing Media from the Media Gallery
- Importing Media Gallery Contents from Another Canvas Course
- Additional Resources
Roles in Canvas:
- Teachers, designers, and TAs can publish videos to the Media Gallery. They can also approve student postings to the Media Gallery.
- Students can add media to the Media Gallery if approved by a teacher, designer, or TA, or if Media Gallery settings are changed.
Adding Media to the Media Gallery
- Open a browser and go to Canvas (canvas.umn.edu). You may need to sign in.
- Select the Courses icon in the left navigation bar.
- Select the course you want.
- Select Media Gallery from the course navigation menu.
- Select the Add Media button.

- Note: If there are playlists in the Media Gallery, select the Media tab to find the Add Media button.
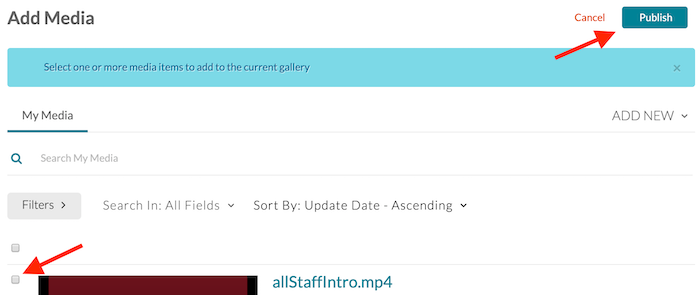
- On the Add Media page:
- To add media you have already uploaded, locate and select the checkbox next to the video you want to add, then select Publish.

- To upload or create new media, select an option from the Add New menu.
- To add media you have already uploaded, locate and select the checkbox next to the video you want to add, then select Publish.
- After selecting Publish or uploading/creating new media:
- Teachers, designers, and TAs: The page updates with the message "All media was published successfully."
- Students: Depending on the settings in the Media Gallery, the page updates with one of two messages:
- "All media was published successfully."
- "All media was published successfully. Note that your media will not be listed until a moderator approves it."
- When finished processing, the media will appear in the Media Gallery listing.
Removing Media from the Media Gallery
Instructors, designers, and TAs, use these steps to remove published media from the Media Gallery:
- In the Media Gallery, select the Media tab
- Select
 (Detailed view)
 - Select the X (Remove from channel) to the right of the media you want to remove. The Remove Media confirmation box appears.
- Select the Remove button.
Importing Media Gallery Contents from Another Canvas Course
Canvas course teachers, designers, and TAs can import the contents of one course's Media Gallery into another course's Media Gallery. This feature is helpful when copying course content from one semester to another. You need to be enrolled as a teacher, designer, or TA in the Canvas courses that you are importing to and from before you can follow these instructions:
- Go to the new course site that you want to import a Media Gallery into.
- Select Media Gallery in the course navigation menu.
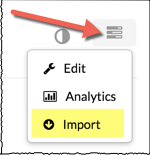
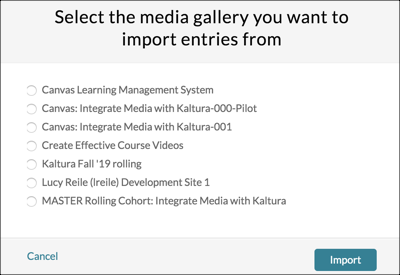
- In the Channel Actions menu, select Import from the dropdown menu. A box will appear containing a list of courses that you have access to that include Media Galleries.

- Select the course with the Media Gallery you wish to import and click Import. A message saying that the import has begun should appear for a few seconds and then disappear. Gear icons in the top right corner will move as the import continues. The larger the gallery, the longer the import will take.

Once the Media Gallery imports successfully, a green confirmation text box appears. Imported media appears in the Media tab.
