
Queries are the backbone of your campaign. Using Query Builder to create your campaign will determine who you call. You can use a large variety of criteria to narrow down members of your campaign.
You will be adding at least one query within the List/Campaign record. This determines the members that appear on your Caller Lists.
You can add more than one query to a campaign and at any point add an additional query that will exclude certain members from the campaign on your original query. You cannot add just an exclude query. All campaigns with queries must have at least one included query.
Creating a New Query
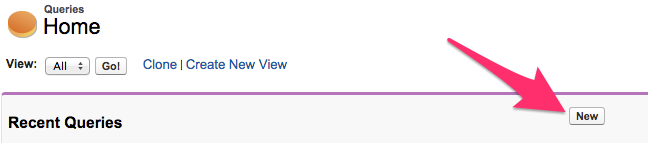
- Click on the Queries Tab from your homepage if showing in your default tabs or click on the All Tabs (+) button and select Queries from the list.
- From Queries Home click New to create a new query. This brings up the Build Prospect Query screen.
- From the Build Prospect Query screen use the Prospect Query builder to define who will be included in the campaign:
- Query Name - A name is required for every query. Using something descriptive will aid in identifying the query for later use.
- Query Description - An optional text box to add a description for the query. This can be helpful in differentiating between queries with similar names and it can also be a search basis to help in finding the Query later on.
- Status - Use to indicate if the query is Active or Inactive.
- Define Criteria - Use the drop-down menus to select the desired Prospect fields, operator logic, and values.
- If you are unsure of the value, a field will return. Look at a Prospect record for verification.
- Some of the options available in the dropdown are Suspect specific and will not return results.
- Pay attention to the type and format of the information in the Prospect record to determine if the criteria will be useful to you.
- Make sure it is a field your campus uses.
- Remember there may be more than one field that could contain the desired information. You would need to add them all.
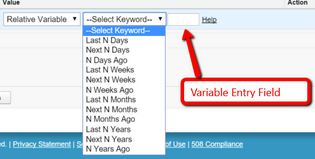
- When filtering on date fields, you will get three options in the Value dropdown:
- Date Entry allows you to select a specific date.

- Keyword Entry gives you a dropdown with selected time period options such as Today or Last Month.
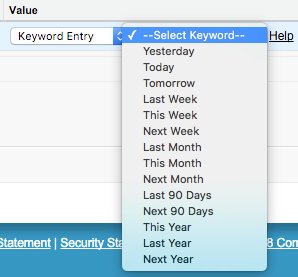
- Relative Variable gives you a dropdown box with filter options to use in conjunction with a chosen variable you enter into the Variable Entry field to replace N.
- For example, putting 30 in the Variable Entry field and selecting Last N Days from the dropdown will give you results for the Last 30 days.
- For example, putting 30 in the Variable Entry field and selecting Last N Days from the dropdown will give you results for the Last 30 days.
- Date Entry allows you to select a specific date.
- Based on the given criteria, the Filter Operators in the drop-down menus can add or remove Prospects .
- Use the Lookup icon next to the Value field in Picklist and Multi-picklist field types to select available values.
- If you want to return a value (say 3.0 as a GPA), remember to choose Less Than OR Equal or Greater Than OR Equal.
- Include and Exclude operators only work on lists where multiple options are able to be selected such as Major of Interest or Race. They will work as "OR" when more than one selection is checked off in the query.
- Filter Logic - Use the filter logic to control inclusion and exclusion of the criteria.
- The numbers refer to the rows in the define criteria area.
- The same logic that is available for reports is available for filters, e.g., AND, OR, NOT, and parenthetical grouping can all be used.
- View Results can be used to preview the results of the query.
- Once all information desired has been entered and you are happy with your View Results preview, click on Save Query.
