
When videos are uploaded to Kaltura in Canvas and MediaSpace, they are automatically captioned. This is done through the use of automatic speech recognition (ASR), which scans the audio track for spoken English. Media owners and co-editors can remove the automatic caption and associated files from a specific video in Kaltura.
In this article:
Removing Automatic Captions
- Log in to canvas.umn.edu.
- Select My Media (Kaltura) from the Account menu.

- If prompted to authorize Canvas to access your Kaltura account, select Authorize.
- Your personal My Media appears. Find the video you want to remove a caption file from and select the Edit icon
 located to the right of the video.
 - Select the Captions tab under the video.
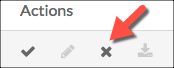
- Select the X next to the English caption to delete it.
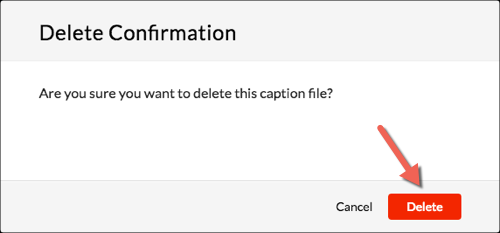
- Select Delete in the popup box that appears.
Removing Associated Files
When videos uploaded to Kaltura are automatically captioned, additional files are created for use in the Interactive Transcript Viewer. However, when you remove caption files, it is a good idea to remove the associated Interactive Transcript Viewer files as well. Doing so creates a more predictable experience for viewers.
- Log in to canvas.umn.edu.
- Select My Media (Kaltura) from the Account menu.
- If prompted to authorize Canvas to access your Kaltura account, select Authorize.
- Your personal My Media appears. Find the video you want to remove associated files from and select the Edit icon located to the right of the video.
- Select Attachments under the video.
- Select the X next to the files ending in .txt and .json to delete them.

- Select Delete in the popup box that appears.