
Design Tools for Canvas: Create a Course Homepage Using a Design Tools Template
This guide walks through how to create and customize a Canvas course homepage using a Design Tools template. Design Tools is a package integrated within Canvas that provides additional tools for style and design of course pages. Design Tools has several homepage templates that can be customized and built out with other common homepage features such as a block for teacher information and a list of course modules.
Create a Course Homepage Using Design Tools
Choose a Banner and Template
This article covers how to prepare an image for use in a Design Tools homepage template. This article is one of a series of articles in the self-help guide Design Tools for Canvas: Create a Course Homepage Using a Design Tools Template.
Design Tools homepage templates require the use of a banner image. Design Tools does have images already uploaded into the homepage templates that you can use, typically nature scenes from a desert location. However, you may also choose to use your own image with the template.
Finding a banner image
There are many options for finding a banner image for your course site:
- Use an image of your own.
- Google an image to find one that is not copyrighted for use.
- Access free stock content through the University's stock content tools (must be on a computer connected to eduroam to access this OR be set up with VPN access).
- Make an account for another free graphic stock application to find a picture.
The best banner size to use in a Design Tools template is a 10:3 ratio. There are several cropping tools that you can use for free to help crop your image to a 10:3 ratio if the image you want to use is not already confined to that ratio.
Uploading a banner image to the course site
Once you have your image cropped and saved to your computer, upload it into the Canvas course site that you want to use it in:
- Go to the course site you will use the banner in.
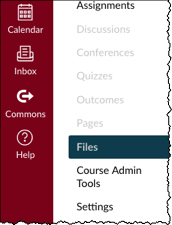
- Click Files in the course navigation menu:
- Click Upload in the top right corner. Your computer's file system will open up.
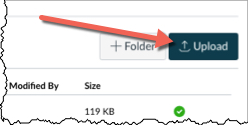
- Find the image that you saved on your computer and select Open. You will see the file appear in the Canvas files area with an upload status bar that will disappear once it is fully uploaded.
Once the image is fully uploaded to the course files area, it is ready for use in a Design Tools template. See Select a Design Tools Homepage Template for information on putting the banner image into the template.
This article covers how to choose a Design Tools homepage template to use in your course site. This article is one of a series of articles in the self-help guide Design Tools for Canvas: Create a Course Homepage Using a Design Tools Template.
Selecting a template
- Go to the course site for which you want to build a homepage.
- Click Pages in the course navigation menu.
- Click +Page in the top right of the page.
- You may need to click View all Pages above the page in the top left corner to get to the area where you see the +Page option.
- Type "Design Tools Homepage" in the page title field.
- Click Launch Design Tools Rocket Ship icon in the top right corner of the screen:
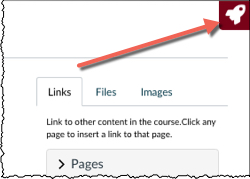
- Notice the Design Tools toolbar that slides out of the right side of the screen. This toolbar will appear every time you click the Rocket Ship icon:
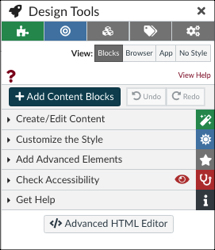
- Click Create/Edit Content in the Design Tools toolbar; a menu will expand downward with several options.
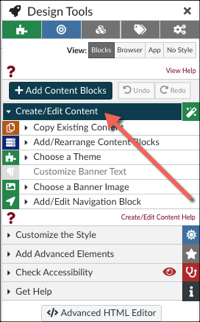
- Click Choose a Theme in the expanded Create/Edit Content menu; another menu will expand downward.
- Click the Front Page button next to the Page Type options above the colored theme blocks:
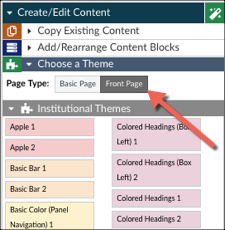
- Hover your cursor over each colored Institutional Themes block to see which template you want to use. A box showing each template should appear off to the left of the toolbar.
- Note: We do not recommend "Circle Overlap" because of user issues.
- Click on the theme block that you want, and the template with that theme will load into the rich text editor in the Canvas page.
- Click Save at the bottom of the Canvas page to save your homepage with the template you have chosen.
Once you have selected the template you want to use, you are now ready to customize it with your course details. See Customize a Homepage Template for more information.
To watch a video demonstrating several ways to use a Design Tools Front Page template in your canvas course, see Make a Homepage with Design Tools webinar recording:
Customize the Template
This article covers how to customize a Design Tools homepage template. This article is one of a series of articles in the self-help guide Design Tools for Canvas: Create a Course Homepage Using a Design Tools Template.
Adding your course information
- Be in Edit mode for the homepage you are building.
- Click Pages in the course navigation menu.
- If you already have pages in this course site, you will see a "front page." Click View all Pages above the page in the top left corner to see a list of all course pages.
- Click on the title of the homepage you are building.
- Click Edit in the top right corner of the page to be in Edit mode.
- Click the Design Tools Rocket Ship icon to launch the Design Tools toolbar.
- Click Create/Edit Content in the Design Tools toolbar; a menu will expand downward with several options.
- Click Customize Banner Text in the Design Tools menu; a new menu will expand below this title.
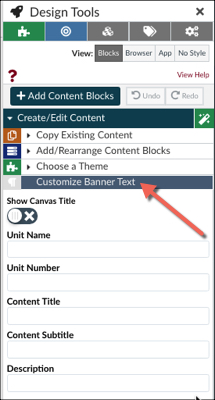
- Keep Show Canvas Title toggle button off.
- Type your course abbreviation code in the Unit Name field (e.g. WRIT, HIST, etc.).
- Type your course number into the Unit Number field (e.g. 1001, 2435, etc.).
- Type your course name into the Content Title field.
- Notice what changes on the Canvas page when you insert text into the fields found in the Design Tools toolbar. This will help you decide what text to place in each field.
- Note that the template will look best if you leave the Content Subtitle and Description fields blank.
Adding your own banner image
The Design Tools homepage template comes with an image already in place. However, you can customize this image to what you would like to use. See Upload an Image for Use in a Design Tools Template if you have not already uploaded an image to use in your banner.
- Click Choose a Banner Image in the Design Tools menu; a new menu will expand below this title.
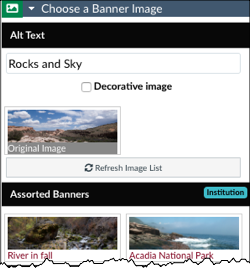
- Notice when you click on this menu option, the Customize Banner Text options disappear and the menu items under Choose a Banner Image appear instead. You can navigate back and forth between the different menus by clicking on them anytime while working on the page.
- Place your cursor over the auto-filled images area in the Design Tools area and scroll down to find your image that you uploaded previously. It will be near the bottom of the image list.
- Click your banner image that you want to use; the image on the template in the Canvas rich text editor will change to that image.
Customizing the navigation blocks
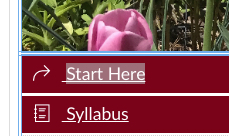
The Design Tools template comes with a few pre-labeled navigational links to various content in a course, such as a Syllabus link, Modules link, and a Start Here link. You can customize these navigational link titles to fit your own course needs. You can also add more or delete navigational links that you will not use.
- Click Add/Edit Navigation Blocks in the Design Tools menu; a new menu will expand below this title.
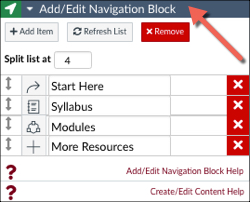
- Customize the titles to the automatically-generated links on the template with titles that fit the context of your class.
- For example, if you want to change the "More Resources" link to say "Class Resource," place your cursor in the text field in the Design Tools menu that says "More Resources." Use the Backspace key to delete that title and type the title "Class Resources." Look at the rich content editor to see how the template has been updated with your changes.
- Add a new navigational link to the list of links on the homepage template.
- Click +Add Item to add a new link.
- Type the title you want for the new link in the text field in Design Tools next to the new line item that was added to this list.
- Use the Split list at box to arrange the navigation blocks into columns across the home page:
- You will need to save the page to see how the Split list at box affects how your template works. It will not change the way that area looks in the rich content editor on the Canvas page in Edit mode.
- Customize the icons used in the navigation blocks:
- Click on the icon next to the Navigation titles. A Custom Icons box will slide out on the left side of the DT menu.
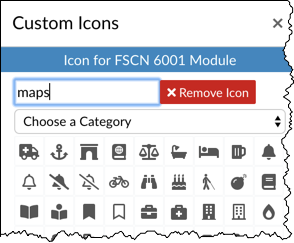
- Use the search box in the Custom Icons box to find an icon that you want to use.
- Click on the icon you want to use to select it. It will automatically appear in the Canvas page rich text editor and the DT Add/Edit Navigation Block area next to the block's title
- Click the X in the Custom Icon box to close that box
- Click on the icon next to the Navigation titles. A Custom Icons box will slide out on the left side of the DT menu.
- Change the order of the navigational links.
- Click the up/down arrow
 next to the icon image to drag and drop the navigation blocks in a different order.
- Click the up/down arrow
- Click the red X icon
 next to any navigation block you do not want to use on the template.
After you have customized your navigation blocks to how you want them titled and arranged, you are ready to create the links for these blocks.
Making the navigation block links
Once you have decided on the number and titles of the navigational links in the template, you can create links to choose where these navigational blocks will take your students when they click on them.
- Inside the rich text editor, highlight the title of the navigation block that you want to create a link.
- Click on the link icon in the Rich Content Editor (RCE) menu and choose Course Links in the menu dropdown. A flyout menu appears on the right with various course pages, assignments, module links, etc. to choose from.
- Locate the item you want to link to in the flyout menu and click on it. The link will connect to your highlighted text in the RCE.
- Click Save and Publish.
- Check that the navigation links go to the places you want them to go to.
For additional ways to modify a Design Tools homepage template, see Design Tools for Canvas: Create a Course Homepage Using a Design Tools Template.
This article covers how to add a Teacher & TA Details block to a course homepage using Design Tools. This article is one of a series of articles in the self-help guide Design Tools for Canvas: Create a Course Homepage Using a Design Tools Template.
Design Tools has a pre-formatted block of content called a Teacher & TA Details block that includes the profile picture and information of anyone assigned to the course as an instructor or teacher assistant. This block is customizable to include only certain instructors and/or TAs. The specific instructor/TA information is also customizable for the course. This block appears on a course page like this:

Adding a Teacher & TA Details block
- Be in Edit mode for the homepage you are building.
- Click Pages in the course navigation menu.
- If you already have pages in this course site, you will see a "front page." Click View all Pages above the page in the top left corner to get to the area where you see a list of all course pages.
- Click on the title of the homepage you are building.
- Click Edit in the top right corner of the page to be in Edit mode.
- Click the Design Tools Rocket Ship icon to launch the Design Tools toolbar.
- Click the Design Tools Settings icon.

- The Design Tools Settings box will open up to the left of the Design Tools toolbar. Click the Advanced Comfort Level button.
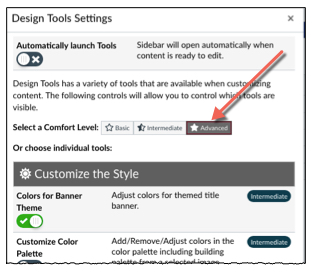
You should now see the Add Advanced Elements menu in the main Design Tools menu to the right. - Close the Design Tools Settings menu by clicking on the X in the top right corner of the box.
- Click Add Advanced Elements; a menu appears below it.
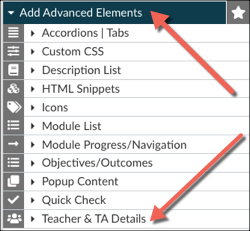
- Click on Teacher & TA Details.
- The menu that appears below will have the name of any teacher and TA that had been placed in the course. If you do not see the name of the teacher or TA whose information you need to pull in for this block, you will need to contact your department's admin staff who enter information into PeopleSoft to get the correct teacher associated with the course.
- Check/uncheck the boxes on the left of each field to decide which fields to display in the block. Anything left unchecked will not appear in the block on the course page.
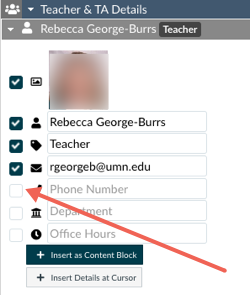
- Fill in the fields with the correct information to display on the page.
- To insert the information as a block on the page (recommended), click +Insert as Content Block. The block will show up on your page in the rich text editor.
Updating the Teacher & TA Details block
You can update the information in the Teacher & TA Details block any time as needed. There will be two new buttons below the Teacher information that is already displayed: Update Details and Remove.
- Follow the steps 6 - 7 above to get to the Teacher & TA Details block.
- Update information in the fields below each instructor or TA in the Design Tools menu area.
- Click Update Details once you have revised the information.
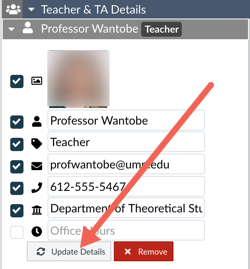
- Click Remove to remove an entire TA or Teacher block (i.e. there is a TA in training that you don't want listed on the homepage).
For additional ways to customize a Canvas course homepage using a Design Tools template, see Design Tools for Canvas: Create a Course Homepage Using a Design Tools Template.
This article covers how to add a Module List block using Design Tools. A Module List block creates a listing of course modules with links to each module that students can access from the course homepage. This article is one of a series of articles in the self-help guide Design Tools for Canvas: Create a Course Homepage Using a Design Tools Template.
Before adding a Modules List block, have all of your modules built with the titles you want to use, and place them in the order you plan to use them in your course site. There is a Reset List button in Design Tools that you can use to refresh information if you make changes to modules, but it is a better workflow to add this piece to your homepage after the modules have been built.
Adding a Module List to a homepage
- Be in Edit mode for the homepage you are building.
- Click Pages in the course navigation menu.
- If you already have pages in this course site, you will see a "front page." Click View all Pages above the page in the top left corner to get to the area where there is a list of all course pages.
- Click on the title of the homepage you are building.
- Click Edit in the top right corner of the page to be in Edit mode.
- Click the Design Tools Rocket Ship icon to launch the Design Tools toolbar.
- Click the Design Tools Settings icon.

- The Design Tools Settings box will open up to the left of the Design Tools toolbar. Click the Advanced Comfort Level button.

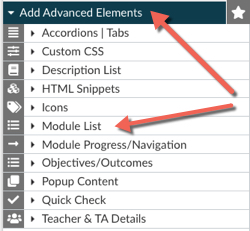
The Add Advanced Elements menu will appear in the main Design Tools menu on the right. - Close the Design Tools Settings menu by clicking on the X in the top right corner of the box.
- Click Add Advanced Elements; a menu appears below it. Click Module List.
- Click the toggle button under Add and Configure Module List so that a green check mark appears; the Module List menu will appear below.
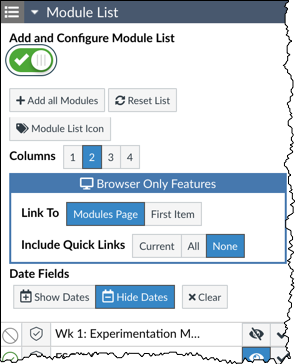
- Click + Add all Modules; any modules you have in your course will show up in a list on the Canvas page.
- Any time you update the modules in your course site (title, order, etc.), you will click the Reset List button to refresh the information on the homepage so that it stays up-to-date.
- Select how many columns you want your modules links to appear in on the page.
- You can change the module icons to either have all modules be the same icon (but different than what is here) or you can change the individual icon of each module.
- Click on the icon next to the Module titles. A Custom Icons box will slide out on the left side of the Design Tools menu.

- Use the search box to find an icon that you want to use.
- Click on the icon you want to use to select it. It will automatically appear in the Canvas page rich text editor and the Design Tools Module list title area next to the module title.
- Click the X in the Custom Icon box to close that box when you are done choosing icons.
- Click on the icon next to the Module titles. A Custom Icons box will slide out on the left side of the Design Tools menu.
- Choose which "Browser Only Features" you would like. These features only show up on computers, not on mobile devices:
- Link To options: Determines whether links will open to that module within the modules page or open the first item within that module.
- Module Page -- links to the module page showing all items in that module.
- First Item -- links to the first item placed in the module (i.e. a module overview page)
- Include Quick Links -- Quick Links display the a list of links to items within a module on the homepage underneath the module title.
- Current -- This option makes links to modules that you have manually marked as current using the Mark as current icon,
 OR you can put in dates in the Design Tools area menu area next to each module title and have the current week's links/module items appear automatically.
 - All -- This option creates a tabbed format with each module title on a separate tab on the homepage. It is important to note that you can't see these tabs from the mobile device.
- None -- This option creates the list of module titles with links, but there is not list of items within that module linked on the homepage.
- Current -- This option makes links to modules that you have manually marked as current using the Mark as current icon,
- Link To options: Determines whether links will open to that module within the modules page or open the first item within that module.
- Choose to display Date Fields:
- Show dates/Hide Dates/ Clear
- Put in dates: show dates/start dates
- You can turn off any modules that you don't need linked from the front page by clicking the Toggle Visibility icon
 .
.
See Design Tools for Canvas: Create a Course Homepage Using a Design Tools Template self-help guide for other content blocks that you can add to a homepage using Design Tools templates.
This article covers how to change the order of various content blocks on a homepage page built with Design Tools. This article is one of a series of articles in the self-help guide Design Tools for Canvas: Create a Course Homepage Using a Design Tools Template.
If you have built a course homepage using the steps in Design Tools for Canvas: Create a Course Homepage Using a Design Tools Template self-help guide, your homepage should have several content blocks:
- the course title area
- the course banner image
- course navigation area
- Teacher & TA Details block
- the Module List block
You can change the order that these different blocks appear on the page.
Changing the Order of Content Block on a Page
- Be in Edit mode for the homepage you are building.
- Click Pages in the course navigation menu.
- If you already have pages in this course site, you will see a "front page." Click View all Pages above the page in the top left corner to get to a list of all course pages.
- Click on the title of the homepage you are building.
- Click Edit in the top right corner of the page to be in Edit mode.
- Click the Design Tools Rocket Ship icon to launch the Design Tools toolbar.
- Click Create/Edit Content.
- Click Add/Rearrange Content Blocks; a list of the different content blocks will appear:
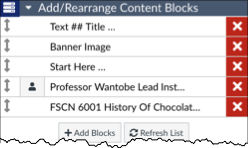
- The titles of these content blocks are based on the text used within the blocks. It is VERY easy to get confused in trying to figure out which content block listed here relates to which section on the actual homepage.
- To help you associate each block to the area on the page, hover over one of the block line items in the Design Tools tool bar. The block in the Canvas page editor will turn to a blue highlight. Use this visual cue to figure out what blocks are where on your page BEFORE you start moving things around.
- Click on the up/down arrow to the left of the block you want to move.
- Drag and drop the content block to a new location in the list. The content on the Canvas page should move as you move items in the Design Tools menu.
- You can click +Add Blocks to add more content blocks to your homepage.
- The Refresh List button is useful when you have added multiple advanced elements and then need to revise something.
- Once the content appears in the desired order on the page, click Save in Canvas underneath the rich content editor.
Apply Your New Page as the Course Homepage
This article shows how to make a page designed with Design Tools be the homepage in a Canvas course site. This article is one of a series of articles in the self-help guide Design Tools for Canvas: Create a Course Homepage Using a Design Tools Template.
Setting a page as a course homepage
- Click Pages in the course navigation menu.
- Click View all Pages.
- Find the homepage that you created in the course pages list.
- Click the Options icon
 next to the right of this page title.
 - Select Use as Front Page in the dropdown menu.
- The page must be published first to be able to select "Use as front Page" in the dropdown menu.
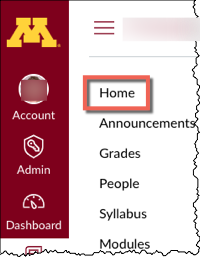
- Click the Home button in the course navigation menu.
- Click Choose Home Page on the far right column of the page.
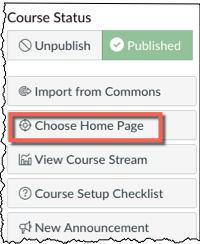
- Click Pages Front Page (the title of your homepage should be listed next to this option).
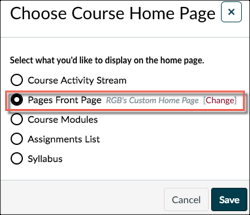
- Click Save.
The page you selected in step 5 as the Front Page should now appear every time you click the Home button on the course navigation menu.