
In this article:
- Installing Kaltura Capture
- Using the Kaltura Capture Control Panel
- Making a Recording in Kaltura Capture
- Publishing Your Recording in Canvas or MediaSpace
- Viewing Recordings Made in Kaltura Capture
- Deleting Recordings Successfully Uploaded to Kaltura
- Additional Resources
Kaltura Capture is an application (app) for Mac and Windows that allows you to record your computer's screen, camera, and/or microphone. Kaltura Capture features:
- Quick publishing to Kaltura: After installing Kaltura Capture, you can quickly send new recordings to Kaltura and post them using Kaltura in Canvas or Kaltura MediaSpace.
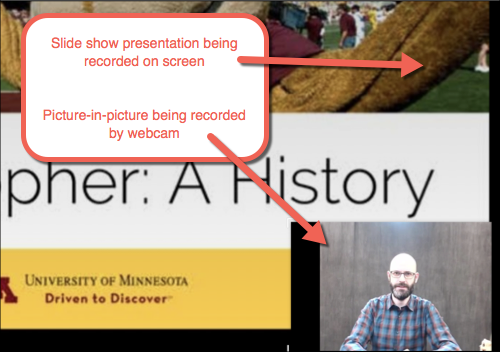
- Multi-source recordings and viewer playback controls: When you record the screen and camera at the same time, viewers will view these two sources separately, with one appearing picture-in-picture. Viewers can:
- Swap the sources
- Set the playback to be side-by-side
- Focus on just one source
- PowerPoint content searchability: If you do a full-screen recording and then view a PowerPoint as a slide show, the slide content will be captured as text and become searchable chapters. Viewers can select an icon in the upper left of the video to search through the slide contents.
- Note: For this functionality, you must use Kaltura Capture to record when viewing a PowerPoint presentation in full screen slideshow mode, or use Kaltura Capture to record the slide portion of the presentation in presenter view.
Installing Kaltura Capture
- Download Kaltura Capture to your computer:
- Launch the Kaltura Capture installer from your downloads folder to proceed with the installation.
- Note for Mac users: You will need an administrator username and password to drag the Kaltura Capture application into the Applications folder.
Note: Once installed, Kaltura Capture updates automatically when a new version is available. This occurs when the application has been idle and not recording for five minutes. If Kaltura Capture is not updating automatically, you can manually reinstall Kaltura Capture following the steps above.
After installing Kaltura Capture, you can launch it from My Media in Canvas or from Kaltura MediaSpace.
Launching from My Media in Canvas:
- Log in to Canvas, select the Account menu, then pick My Media (Kaltura).
- Click Add New in the top right corner.
- Select Record Using Kaltura Capture.
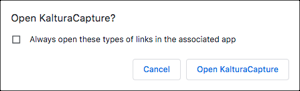
- If you receive a pop-up request, check the box next to Always open these types of links in the associated app and select Open KalturaCapture.
Launching from Kaltura MediaSpace:
- Go to MediaSpace and log in.
- Select Add New in the top right corner.
- From the dropdown menu, select Record Using Kaltura Capture.
- If you receive a pop-up request, check the box next to Always open these types of links in the associated app and select Open KalturaCapture.
- If you receive a pop-up request, check the box next to Always open these types of links in the associated app and select Open KalturaCapture.
Launching from Your Computer's Desktop
Once you have installed Kaltura Capture, you can open it either from the Add New menu in Kaltura or from your computer (in the Applications folder on Mac or Start menu on Windows).
Using the Kaltura Capture Control Panel
After you open Kaltura Capture, the control panel appears over any windows you currently have open.
You can use Kaltura Capture to record both your screen and your camera. Upon playback, the primary source appears large in the background, and the secondary source appears inset in the lower right.
We recommend setting Kaltura Capture to show the screen on the left side of the control panel, which makes it the primary source. Camera should be to the right as the secondary source.

- Start Recording (large red circle): Start recording by selecting this button.
- Screen: Choose the portion of your computer screen you want to record (i.e., a slide show presentation, a specific portion of your screen, or the full screen).
- Select the Screen icon to toggle screen recording off or on.
- Select the down arrow to select what portion of your screen you want to record.
- Camera: Record yourself presenting information in a picture-in-picture tile while recording.
- Select the Camera icon to toggle your camera off or on.
- Select the down arrow to choose which camera source you wish to use if other than your computer's built-in camera.
- Select the down arrow to choose which camera source you wish to use if other than your computer's built-in camera.
- Select the Camera icon to toggle your camera off or on.
- Audio: Controls which device you record audio from.
- Select the Audio icon to toggle the audio recording off or on.
- Select the down arrow to select the audio source.
- Manage: Takes you to the Library of recording you have made in Kaltura Capture on your computer. Refer to Deleting recordings Successfully Uploaded to Kaltura in this article for more information.
Making a Recording in Kaltura Capture
Note for Mac users: If you encounter errors related to secondary or audio devices, or are unable to save or upload videos to Kaltura, refer to How to Enable Privacy Settings for Kaltura Capture on Mac for steps to resolve the issues.
- Open Kaltura Capture.
- Every single time you record, check to make sure your microphone is working properly. Failure to do so may result in recordings with no audio.
- In the control panel, the microphone should fill in when you make noise:
- In the control panel, the microphone should fill in when you make noise:
- Select Record when you are ready to record. A countdown appears before recording begins.
- Once you begin recording, a recording toolbar appears in the bottom right corner of your screen.
- To stop the recording, select the Stop icon and agree to the Are You Sure? message. The video preview opens in your Kaltura Capture library.
- Give the recording a name.
- Choose to Save, Save and Upload, or Delete the recording.
- Save: Saves the recording to your local computer.
- Save and Upload: Uploads the video to your Kaltura account and you can publish it using Publishing Your Video to Canvas or MediaSpace. You will get a notification when the media upload completes, and an additional email from Kaltura when the recording is ready.
Additional Recording Information and Resources
- Learn More About the Recording Menu, including information about annotation tools available while recording.
- Note: The recording toolbar is visible in your video recording and may cause viewers confusion.
- There are two ways to minimize the toolbar when recording.
- Option 1: Select the Minimize icon to hide the toolbar while you are recording.

- Option 2: Change your settings to automatically minimize when recording:
- Go to Manage, then Settings (gear icon).
- Select Save.
- Set Auto-minimize when Recording to Yes.
- Option 1: Select the Minimize icon to hide the toolbar while you are recording.
- To stop recording, you will need to find the toolbar in the Dock (Mac) or Taskbar (Windows).
- There are two ways to minimize the toolbar when recording.
Publishing Your Recordings in Canvas or MediaSpace
Once your recording is complete and uploaded to Kaltura, you can share it through MediaSpace or Canvas:
- Canvas: Add Media from Kaltura Using the Rich Content Editor
- Canvas: Add Kaltura Videos to Media Galleries
- Kaltura MediaSpace: Share and Embed Media
- Kaltura MediaSpace: Use Channels to Group and Control Access to Media
Viewing Recordings Made in Kaltura Capture
The type of video file that Kaltura Capture produces has some extra features allowing viewers to engage with the video content. Refer to Viewing Rich Media in the Kaltura Player for more information.
Deleting Recordings Successfully Uploaded to Kaltura
When you make a recording in Kaltura Capture and upload it to Kaltura, the original recording remains on your computer. Kaltura Capture recordings take up a lot of space, so it is recommended that you review recordings periodically and delete unnecessary files.
Suggestion: In your calendar, set a monthly reminder to delete old recordings from Kaltura Capture.
To delete old Kaltura Capture recordings from your computer:
- Open Kaltura Capture. The control panel appears.
- Select Manage. The Library appears.
- Recordings with a Re-Upload button next to them have already been uploaded to Kaltura. Select Delete to remove the recording from the Library on your computer.
- A confirmation appears: Are you sure that you want to delete <your file name>?
- Select Yes Delete.