
While people are able to sign up for visits on the site themselves, sometimes it is better or necessary to create a visit for them. Creating an Event/Visit from a Prospect record brings up the Event/Visit Picker.
The Event/Visit Picker has access to previous events and visits so it can add information after the fact if the visitor showed up unexpectedly or had a problem with signing up for their visit. It will also list any Event records and/or Event Sessions that have been setup specifically for staff to add to records.
Creating an Event or Visit from a Prospect Record
Navigate to the Prospect Record (if needed)
- Click on the Prospects Tab from your homepage if showing in your default tabs or click on the All Tabs (+) button and select Prospects from the list.
- At Prospects Home, find the Prospect that needs the Visit created from the list of Recent Prospects or by searching the appropriate dropdown selection in the View: menu and clicking Go!
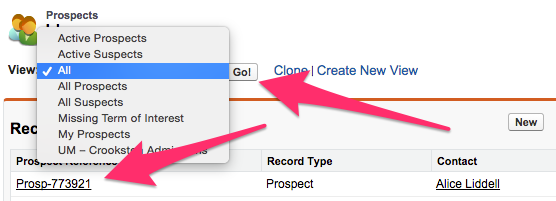
- Once the appropriate Prospect is found, click on the Prospect Reference to open the Prospect record.
Create a Visit
- From either the top or bottom of the Prospect Detail section, click on the button for Add to Event/Visit. This brings up the Event/Visit Picker.

- From the Event/Visit Picker, available visits can be searched by using the navigation elements on the calendar and/or filtering by Event Type at the top of the screen.

- The month and week buttons allow you to toggle your view for your needs.
- To move forward and backward months/weeks use the arrows over at the top right of the calendar.
- The Event Type filter will be defaulted to all and items on the calendar will be color-coded as outlined at the top.
- Once the Event or Visit you want to select is showing in the calendar click on the entry to bring up more details. A screen with additional information about the Event or Visit will pop up.

- If you decide that you would like to schedule the Prospect for this event or visit click on the Schedule for Prospect button. This brings up options within the Event/Visit Picker.

- How you fill out the following fields within the Event/Visit Picker will largely be determined by internal business practices and the visit or event itself.
- The Selected Event section will be filled in with details from the chosen event and date chosen from the calendar and includes a button to Pick Another Date if necessary.
- The Event Attendee - Individual section has places to fill out information for the individual that is attending.
- Number in Party allows you to indicate the number of people attending for the visit or event.
- Attendee Status allows you to pick a status from the dropdown following internal business processes.
- Parent Email allows you to enter an email address for the parent of the prospect.
- Special Assistance allows you to enter any specifics for assistance needed by the prospect.
- Special Requests allows you to enter any requests made by the prospect in regards to the visit.
- Event Sessions for Attendee will have any sessions entered on the original Event record and allows you to use the checkboxes to schedule sessions for that particular individual.
- Once all the information is filled out click on Create Event Attendee in the Event Attendee - Individual section to finalize the selections and create a new Event Attendee record.
