
Follow these instructions to make your use of Mailchimp compliant with University of Minnesota email security settings.
Setup Verification
Verification involves setting up "umn.edu" as a "from" domain in your emails.
- Login to Mailchimp.
- In the upper left hand side corner, Click the Website icon

- Select Domains from the yellow column

- Click the Verify a Domain button. The Verify Domain pop-up window will open.

- Enter the email address to verify (the email address from which your mailings will originate).

- Click Send Verification Email
- Open a separate browser window.
- Go to the email account and open the verification email.
- Do one of the following in the verification email:
- Select the Verify Domain Access button or,
- Copy the verification code, paste it in the field provided in Mailchimp, and select Verify.
Your domain access is now verified. You can now use Mailchimp to send mass email from the verified umn.edu email address.
![Verified domain screenshot says "umn.edu; to help improve your email delivery rates, [link]authenticate your domain." An alert says "verified".](https://it-knowledge.umn.edu/sites/it-knowledge.umn.edu/files/tdxassets/KB0021746-screenshot-2.png)
Setup Authentication to comply with DMARC
Authentication involves customizing your account so that campaigns appear to come from umn.edu. If your sender address ends in "@umn.edu," follow the instructions below. If you're sending from a subdomain (ie: "@cla.umn.edu"), you'll need to contact Technology Help so we can add an entry to our DNS records for that subdomain.
You can set up authentication from the same screen where you set up verification.
- Select Authenticate to the right of the alert that says "verified". A popup screen opens.
- Select Authenticate Domain.
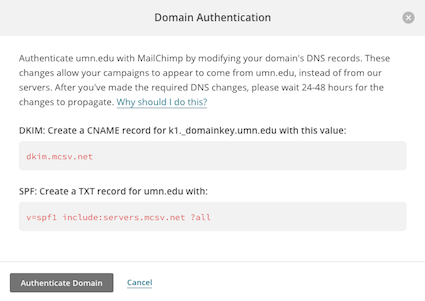
Your email address is now authenticated. You can now use Mailchimp to send mass email from the Authenticated umn.edu email address.
