The Events App in Recruitment CRM allows you to manage all objects related to Events and Visits in one convenient space. It also allows you to create Visits and Events in a more streamlined fashion.
The below instructions are intended to help you create an Event or Visit completely, with all necessary items to have sessions and dates showing appropriately for potential attendees and/or employees.
Creating a New Visit or Event
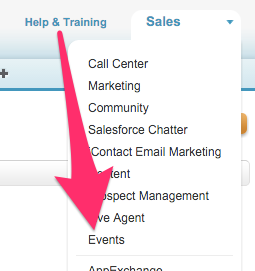
- Select Events in the App menu dropdown to bring up the Events App.

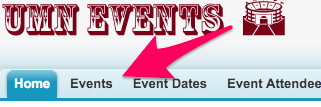
- Once on the Events App click on the Events Tab.

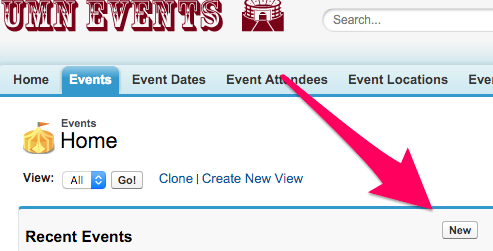
- On Events Home click New. This brings up the Event Edit screen.

- Once on the Event Edit screen there are some important fields to fill out in the Event Information section:
- Event Name will show for both internal and, if putting on the website, external audiences so it should be something meaningful to both.
- Event Type is going to determine which website this Event or Visit is going to be visible on so make sure you are using the correct type for the intended audiences.
- The Event Sub Type options will change depending on the Event Type selection and should be used in accordance with your internal business processes.
- The Internal Description field lets you put information or notes related to this Visit or Eventto communicate with internal users, note that only Users will see this and only within CRM.
- Owner will default to you and cannot be changed at this time.
- If your campus is using Event Categories you are able to use the Lookup icon to find and associate the necessary Event Category record.
- The Campus dropdown allows you to select your campus as needed.
- The Web Description will appear on your public facing web page as a description of the Visit or Event.
- This is Rich Text Format and can be manipulated as needed.
- Keep in mind any formatting for your destination site as well.
- Registration Instructions allows you to enter text that will appear at the top of your registration form webpage.
- This can be used to provide information such as "Watch email for your parking pass!", current construction concerns, etc.
- The text you enter for Registration Thank You Message will show on the page after the end user clicks Submit on the registration form webpage.
- The information contained within the Event Planning section is available for you to use in conjunction with your internal business processes as needed.
- Once all of the information has been filled in as needed click on Save at the bottom of the page to be brought to the Event record.
- On the Event record you are now able to add the Event Sessions needed for the Visit or Event.
- Note: It is necessary to do this prior to setting any Event Dates in order to have the Sessions automatically associated with those Dates.
- From the Event record click on New Event Session down under the Event Detail or hover over Event Sessions at the top to get another window with an option to click on New Event Session.

- Once on the New Event Session screen fields are available to fill in accordance with your internal business practices:
- Session Name will show within CRM and, if Visible on Website? is checked and there are valid date and time options, on any public site your campus may have for displaying Visits or Events.
- The Session Type picklist allows you to choose a session type in accordance with internal business processes.
- The Required Session checkbox allows you to indicate whether or not this Session will be required for this Visit or Event.
- The Visible on Web? checkbox allows you to determine whether or not the Session will show for end users on the external website or if it will just be available for staff within CRM.
- The Campus picklist allows you to pick your campus from the dropdown menu.
- The Event field will already be filled in with the Event you are creating the New Session from.
- The Event Date field should be kept blank as dates will be added after all of the Sessions are created in order to associate all of the sessions with all of the necessary dates.
- The Location section requires you to pick one of the two available options.
- If your campus is using Event Locations you can use the Lookup icon to search for and associate the necessary Event Location record.
- If your campus is not using Event Locations and/or this is a special event that does not have an Event Location record you want to associate use the Session Location (text) box to type in the required location information.
- Session Start and End Time are required fields. There is no particular format required.
- If you need to require a limited number of people for this particular Session you can use either the Max Session Attendees or Max Session Attendees with Guests fields to restrict the number of people able to register for this Session via the website (employees within CRM can always override the max).
- Note: If you need to set a number of people for the entire Visit or Event you may want to leave these fields blank and use the Max options when creating the Event Dates instead.
- If you need to create more Sessions for this Visit or Event click on the Save & New button at the top or bottom of the page to be brought back to the New Event Session screen.

- If you have added all necessary Sessions click on Save at the top or bottom of the screen to be brought back to the Event record to take the final step and add the Event Dates.
- From the Event record click on the Add Event Dates button at the top of the screen.
- If you are not seeing the Add Event Dates button you may be on the Event Session record instead. You can click on the Name of the event in the Event field to be brought to the Event record.
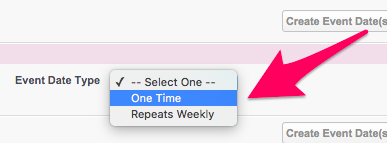
- Select the desired Event Date Type from the dropdown to bring up the available options for the selected Event Date Type on the Add Event Dates for Event! screen.

- Once the options are expanded for the selected Event Date Type information is able to be filled in as needed:
- A One Time event will be giving you the option to enter a Date and the Visible on Web? checkbox.

- A Repeats Weekly event will have more options that will allow you to add a Start On and End On date no more than year apart, a dropdown to change the Repeat Frequency, Days of the Week, and Visible on Web? checkbox.

- The Location section requires you to pick one of the two available options.
- If your campus is using Event Locations you can use the Lookup icon to search for an associate the necessary Event Location record.
- If your campus is not using Event Locations and/or this is a special event that does not have an Event Location record you want to associate use the Session Location (text) box to type in the required location information.
- If you need to require a limited number of people for this particular Event you can use either the Max Attendees or Max Attendees with Guests fields to restrict the number of people able to register for this Visit or Event via the website (employees within CRM can always override the max).
- Note: If you have added these at the Session level and this number is smaller than one you may have added for a particular Session the smaller number here will override the larger number on the Session.
- A One Time event will be giving you the option to enter a Date and the Visible on Web? checkbox.
- Once all of the information is filled in as needed click on Save to finalize the Event Dates and associate them with the Visit or Event and all associated Sessions.
