
The Service Console is often used for Case management, which means you'll often be working out of a Queue. Most of the time that queue will be coming into a shared email address, so you'll want your replies to come from that shared email address as well.
The instructions here show you how to update your information within CRM to show desired contact information when replying to Cases and/or otherwise communicating via email from within CRM.
Instructions
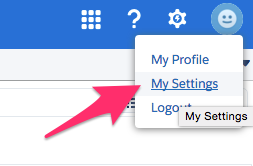
- Click on the User Menu icon in the upper right corner of the top bar and select My Settings from the drop-down menu. The My Settings page opens.
- Click on Email to expand the selection.
- Select My Email Settings to bring up My Email Settings options on the screen.

- How you fill in the fields here will be determined by internal business practices. An outline of available fields and examples for use are below:
- Email Name is where you want to put in the name you'd like to appear on outgoing emails as the From.
- Depending on your internal business processes you may want to keep this as your name and/or update it to something more generic.
- Email Address is where you can update the return address to a shared or departmental account if needed.
- The Automatic BCC options will indicate whether or not you want a copy of the emails you're sending from CRM to also show up in the inbox of the return address you entered above.
- For shared accounts, in particular, it is very likely you'd want to select the option of No here.
- The Email Signature box allows you to put in a text email signature per your internal business guidelines.
- Email Name is where you want to put in the name you'd like to appear on outgoing emails as the From.
- Once you are done filling in all of the information click on Save at the bottom of the screen to finalize your Email Settings.
