What Cases you should be accessing and which Cases will be available to you will vary per your internal business processes.
This article is intended as a general overview on how to navigate the Service Console to get different Case Queue Lists and get to individual Cases or take Mass Actions as needed. It is not intended to replace or modify any internal business processes.
Navigating to the Case Queue List
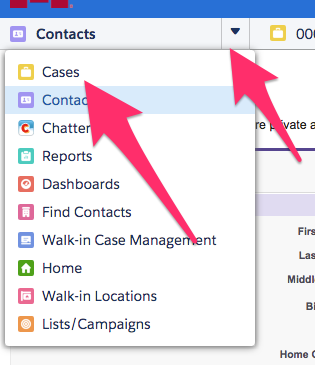
- Use the arrow to bring up the dropdown for the Service Console Navigation Tab and select Cases.

- This brings up the Cases Tab where you will be seeing Cases for your default Queue per your account settings.
- If needed, use the dropdown at the top of the screen to select a Queue List to view.
- Check with your internal business practices to determine which selections available to you will bring up the Cases you should be working on.
- The List Views available in the dropdown may be for different Statuses of the same Queue (i.e. New versus Open) so pay attention to any naming conventions.
- Cases assigned directly to you as a User will be in My Cases.

Opening an Individual Case
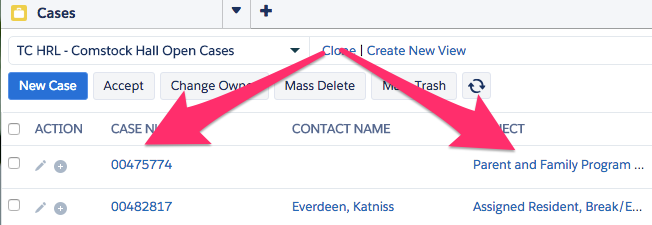
- Once you are viewing the correct Queue that you should be working on open the Case you want to work with by clicking on either the Case Number or Subject (if showing) in the list.

Using Mass Actions
- Under the dropdown where you selected a Queue List View there are several options that allow you to take actions on several Cases at once.

- Clicking on New Case from this screen will create a New Case specifically for the View/Queue that is showing in the dropdown at the top of the screen.
- Clicking on Accept will assign any Cases that are checked off to the left of the Action column to your personal queue.
- Clicking on Change Owner allows you to change the owner of any Cases checked off to the left of the Action column.
- These Cases can be assigned to either a User or a different Queue from this screen using the Lookup icon.
- Checking off Send Notification Email will send the new Owner of the Case(s) an email notification once the changes have been saved.
- Clicking Save from this screen will change the Owner information and bring you back to the view you were looking at prior.

- Clicking on Mass Delete should be used with caution, as it will immediately delete any Cases checked off to the left of the Action column
- Clicking on Mass Trash will immediately move the selected Cases to your organization's default Trash Queue.
- Clicking on the Refresh Button
 will refresh the View/Queue that you are on.
