The Universal Design Online [content] Inspection Tool (UDOIT) helps faculty discover and repair accessibility issues in their online Canvas courses. This article covers:
- Understanding what UDOIT scans
- Scanning a course with UDOIT
- Addressing common errors found by UDOIT
- Turning on UDOIT in the navigation settings
Understanding what UDOIT scans
UDOIT (pronounced, "You do it") scans online course content within a specific course site and creates a report that identifies possible accessibility issues. Additionally, the included U FIX IT tool guides faculty to repair issues found from UDOIT with an easy-to-use user-interface.
UDOIT checks the following areas of a course:
- Announcements
- Assignments
- Discussions
- Files (i.e., .html files)
- Pages
- Syllabus
- Module URLs
Some items cannot be examined by UDOIT. These include external documents and some videos/audio files for captioning/transcripts. UDOIT will list these items in its report and ask you to confirm that the item is accessible (e.g. a PDF has optical Character Recognition-OCR and videos have been accurately captioned).
Here are some of the accessibility features that UDOIT looks for:
- Use of headings in page structure
- Alternative text for images
- Link syntax, and vague link names.
- Table headers
- Color contrast
- Video captions
- Alerts of PDF files present
This tool is listed in the course navigation area as "Check Accessibility with UDOIT." Students do not see this course navigation item in your course site. If it is not listed in the course navigation area, see Turning on UDOIT in Navigation Settings to get the tool to appear in the course navigation.
Scanning a course with UDOIT
Use either Chrome or Firefox browsers for best results with this tool.
- Navigate to the Canvas course site that you want to run UDOIT.
- Select Check Accessibility with UDOIT from the course navigation area.
- Check the All box next to the Select Content option.
- Select Scan This Course. A message will appear verifying that the tool is working. Do not navigate away from this page.

Once the tool is done scanning the course, a report will appear on the page. The Report Summary will list a number of errors and a number of suggestions. Your first report will most likely show a large number of errors. This is normal for an initial report.
Addressing common errors found by UDOIT
As you continue to scroll through the report, note that any time you see a + sign next to an area of the report, you can click on it and see the specific error or suggestion that the tool found. The expanded report gives more information:
- The specific type of error found on that course page and links to more information about that type of error and how it may affect learners.
- The option to select "View the Source of this Issue" at any time to see the specific area of the page that the tool found an error. Open up this link in a new tab or window.
- The option to select U FIX IT! to fix the error.

By addressing the most common errors in your course, the number reduces quickly. We recommend you pick one category at a time and fix all the issues in that category. For example, start by adding alt. text to any images that come up in the report as missing alt. text. Then, focus on making sure all linked text is descriptive.
Common Errors found by UDOIT
The following is a list of links to videos on how to fix the common errors UDOIT finds:
- Udoit Error: No Closed Captions Found (4:34)
- Udoit Suggestion: Alternative text should not be the image file name (4:21)
- Udoit Error: No Row or Column Scopes Declarations Found in the Header of Your Table (3:47)
- Udiot Suggestion: Link Text Should be Descriptive (2:43)
- Udoit Error: Headings Should Contant Text (1:51)
- Udoit Error: No Table Headers Found (2:30)
- Udoit Error: Insufficient Text Color Contrast with the Background (3:13)
- Udoit Suggestion: Avoid Using Color Alone for Emphasis (2:24)
- Udoit Suggestion: Avoid Styles for Document Structure (3:10)
- Udoit Intro (2:00)
Additional support for correcting these common errors will be coming soon. For additional support with using this tool or help fixing errors, please reach out to your college's Canvas Contact or email [email protected].
Turning on UDOIT in navigation settings
- Select Settings in the course navigation.
- Select the Navigation Tab at the top of the Settings page.

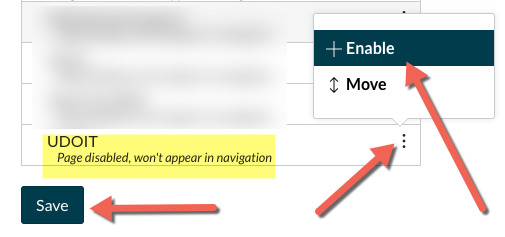
- Find the UDOIT tool in the list of features.
- Select the three-dot ellipses to the right of the feature name. A menu pops up.
- Select +Enable.
- Scroll to the bottom of the page and select Save. You should now see UDOIT listed in the course navigation area.

Once you find UDOIT in the course navigation area, see Scanning a Course with UDOIT.
