
This is the sixth of nine tasks for setting up your Jadu Central forms to work with Jadu Connect. Please go to the Self-Help Guide, under the Configure a Jadu Connect Workflow column, for more information.
This article explains how to append data from a subsequent form to an existing Jadu Connect case. For example, when a supply request is approved, you may want to append the approval response and approval comments to the Jadu Connect case so they can be carried forward to the fulfillment team using the next form in your process.
Note: The following steps are completed in Jadu Central within a subsequent or next form of your workflow process.
- Go to the Templates tab.
- Click Create Template.The Create Action Template window appears.
- Template type: Under the Jadu Connect section, select Edit Case and click Next.
- Enter a meaningful title for the template (ex: Edit Jadu Connect Case) and click Next.
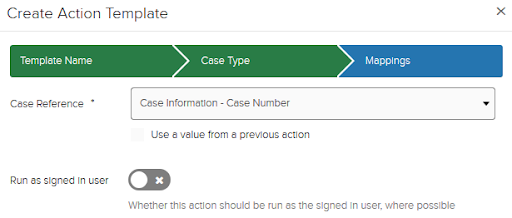
- From the Case Type dropdown, select your case type that this form is associated to and click Next.

- Map the fields in the current Jadu Central form to the Jadu Connect fields in your case type.
Note: It is best practice to map all Jadu Connect fields to an Jadu Central field/logic. If a Jadu Connect field contains data and that data is not mapped from subsequent forms when using the Jadu Connect - Edit Case template, the Jadu Connect field will be cleared out.- In the Mappings section, select the Case Information - Case Number field from the integrated component on your landing page from Task 4.
- Make sure Run as signed in user is off.
- Choose the appropriate Jadu Central data in the fields on the right side to send to each Jadu Connect field listed on the left.

Note: If a Jadu Connect field is not listed, go to your Case Type setup in your Jadu Connect Form (Edit). Only fields added to the Jadu Connect Case form are displayed here.
- Click Save.
Creating or Updating a Rule to Edit the Jadu Connect Case
Create a new rule or update an existing rule to create the Jadu Connect case. If you have more than 1 rule in your form that runs based on different conditions, update the appropriate rule(s) that you want to edit a Jadu Connect case.
- Go to the Rules tab.
- Click Create Rule.
- Or, select the rule you wish to update.
- Enter a meaningful title for your rule.
- Choose a When statement.
- Add a Then statement resulting in a case edit.
- From the dropdown menu, under the Jadu Jadu Connect header, choose Edit Case. Template dropdown options appear to the right.
- Select the Edit Jadu Connect Case template created in Setting Up an Action Template to Edit the Jadu Connect Case section above.

- Click Save.