
All users who have access to CXM have the ability to view and filter cases.
In this article:
- Accessing the Case List
- Understanding the Case List View
- Viewing Case Submission Details
- Using Case List Filters
- Additional Resources
Accessing the Case List
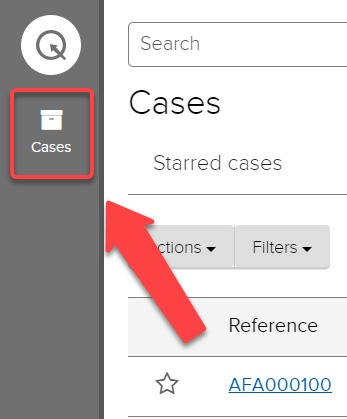
Case Builders and Case Viewers can access submitted cases within their category using the Case List.
- After logging in, by default you are on the Case list page, All cases tab.
- Or, click the Cases icon on the left-side navigation bar to go to the Case list from any other area of CXM.
Understanding the Case List View
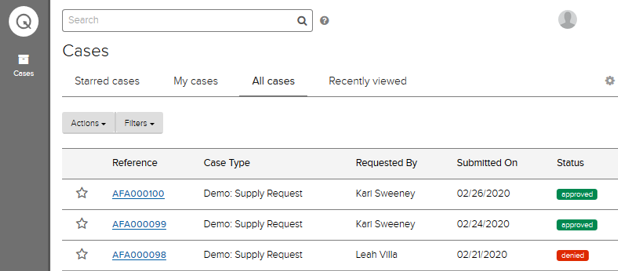
The Case list shows all case submissions that you have access to view. Several columns show by default.

- Reference: The unique reference number assigned to the case submission.
- Click into a Reference number to see additional details about the submission.
- Case Type: The business workflow used for the submission.
- Requested By: The user who submitted the XFP form
- Submitted On: The date of submission
- Status: Where the case is currently at in the workflow.
Viewing Case Submission Details
Select a Case Reference number to view the case submission information.
Timeline
By default, you are in the Timeline tab. The Timeline tab displays case submission updates with the most recent data update at the top. Each section is a new submission update to the case.

Details
The Details tab shows the current CXM fields and the most recent data each field contains from an XFP form submission.

Files
Note: This feature currently has limited functionality. We recommend using Jadu XFP to view file uploads.
History
The History tab shows details about case creation and status changes. Click View Details to see the status change.

Using Case List Filters
Use Case list filters to change your view of case submissions.
Creating a Case List Filter
- Go to the Case list.
- Select Filters.
- Choose New Filter from the dropdown menu.

- Choose New Filter from the dropdown menu.
- The Filter By option appears. Select the Add New icon.

- Select the desired filtering option from the Filter by dropdown menu that appears
- Complete any required filter information and click Add.
- Repeat step 3 to add additional filters.
- Select Columns to choose which columns to display for the filter and click Save.
Note: If you choose a column that isn't used by the case type you are filtering on, the column will be empty.
- Note: To search for a column by name, use the browser's find in page functionality by entering Ctrl + F (Command + F on Mac) on your keyboard. A search box will appear (its position varies between browsers)—you can enter the word you're looking for.
- Click Save. The Save filter pop-up appears.
- Filter title: This will appear as a tab on your Case list page
- Filter visibility: Choose from the dropdown who can view/use the filter
- Click Save to save your filter.
To use a saved filter, select it from the tabs at the top of the Case list page.

Selecting Case List Filters
Use Filter Subscriptions to show or hide filters when viewing the Case list.
- Go to the Case list.
- Click the Choose Filters icon.

- The Filter subscriptions pop-up appears.

- A checked filter displays as a tab at the top of the Case list screen.
- Unchecking a filter hides it from the Case list screen.
- Click Save.