
To manage people on a site, you must have the Access Manager role. If you do not see People in the admin menu, contact the site owner.
Anyone who can log in to the University of Minnesota using an Internet ID can be given access to your site.
If you need to give access to someone who does not have a University of Minnesota Internet ID, you can ask them to create a Guest Account. They will need to tell you the alias for the account in order to configure it in the Drupal Lite 9 site.
Add a new person to the site
- Log in to your site.
- Select Manage in the administration toolbar.
- Select People.
- Select Add User at the top of the page.
- Enter the E-mail address -- this must be the University of Minnesota email address. For Guest Accounts, it would be the email address they entered when creating the guest account.
- Enter the Username -- this should be the University of Minnesota Internet ID.
- If you are adding someone that has a Guest Account, you will need to enter their alias.
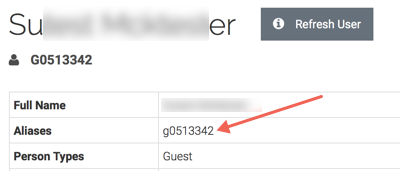
- Ask the person to log in to my-account.umn.edu
- Look for the Aliases field. The alias to use is the one that begins with a 'g', for example 'g0513342'
- If you are adding someone that has a Guest Account, you will need to enter their alias.
- Enter a Password.
- Note: this password is a requirement of the add user module in Drupal. The password will never be used by the person. Instead, when they sign in, they will use the standard University of Minnesota login.
- Enter the same password in the Confirm Password field.
- Active should be selected for the Status.
- Select the Role for the person.
- The roles do not overlap. If you need a person to be able to create content and manage users, give them the roles Contributor and Access Manager.
- Notify user of new account will send a confusing email. Leave the box un-checked and notify the person via email instead.
- Contact Settings, Locale Settings and URL Alias have no function in the site's implementation. Leave them with the default settings.
- Select Create New Account.