
For some Drupal developers at UMN, no local development environment is necessary to work on their site. For others, it is crucial to their efficiency in development and maintenance of Drupal sites. The OIT Drupal development and engineering team recommends using the open source tool ddev ("dee-dev"), a flexible and powerful tool that utilizes Docker (a containerization/virtualization platform).
This guide provides a starting point for setting up your site locally with an existing installation of ddev on your macOS, Linux, or Windows device. Should your specific computer's configuration prevent you from following this guide, consider attending an in-person Drupal Lab or submitting a Drupal support request.
Components of Drupal Enterprise Sites
There are three general components to Drupal Enterprise sites (Database, Files/Assets, and Code), however, this guide only requires access to your site's GitHub@UMN code repository and (if you have an existing site) a copy of your existing site Database. If you do not have an existing Drupal site, this guide will help you get started with a new database using the OIT Drupal Platform code.
Note: The OIT Drupal platform does not currently support site owners storing their site repositories on the UMN Github Cloud instance. We will send an announcement to our Drupal Enterprise Platform Google Group when that option becomes available. Presently, site owners must store their site repositories in the University On-Premise instance Github.umn.edu.
- Database
- Site content, various preferences, people/accounts, permissions, etc.
- How to get a copy of existing site database: Self-Service downloads via Drupal Management
- Files
- Images, PDFs, and other assets
- Note: It is not recommended to manually place files in your local dev site. Use the Stage File Proxy Module, as noted in the steps below.
- Code
- Platform-Provided components listed in the composer repository
- This includes, but is not limited to:
- Custom modules and configurations
- Folwell theme based on University Relation's Folwell Design System
- This includes, but is not limited to:
- Site-Specific Code (optional)
- Modules not included in the Platform-Provided Modules
- Folwell sub-theming
- Site-specific configurations
- Platform-Provided components listed in the composer repository
Requirements
Git, GitHub, and Command Line Familiarity
The ddev tool requires usage of the command line and git commands. If you are not familiar with git or using a command line interface, you can learn more in this Git Tutorial from GitKraken.
Refer to the ddev system requirements for specific minimum version requirements before proceeding with this guide. Support options for ddev questions can be found at https://ddev.readthedocs.io/en/stable/#support.
Installation of Docker and ddev
Prior to setting up your Drupal site, install the following using the documentation provided by the ddev community:
- Install Docker
- Note: Docker must be launched and running in order for ddev to start properly in the next section.
- Install ddev
Set up a ddev UMN Drupal Site
- Clone the Drupal composer repository
Note: It can be useful to keep all of your ddev projects in the same parent folder if you have multiple sites to create locally, though this is not required. Each site will need to have a unique name, though.- Choose an appropriate site name to replace the
your-sitetext in the command below:git clone [email protected]:drupalplatform/d8-composer.git your-site
- Change directories into your newly created site folder:
cd your-site
- Determine which branch of the platform code you want to work within
- For Drupal 9, reference
9.x-prodor9.x-dev - For Drupal 10, reference
10.x-prodor10.x-dev
- For Drupal 9, reference
- Choose an appropriate site name to replace the
git fetch
git checkout branchName
- Within the newly-created
your-siterepository folder, configure ddev as a PHP project-type- Start the configuration process:
ddev config --project-type=php - Hit the Enter or Return key if prompted for a Project Name
- Later in this guide, you will reconfigure ddev to be a specific Drupal 9 or Drupal 10 project. Until then, this will be initialized as a generic PHP project.
- Note: Re-run this command any time you update ddev, then run
ddev restart
- Start the configuration process:
- Start ddev
- Ensure that Docker has finished starting and is ready before running the following command:
ddev start
- Ensure that Docker has finished starting and is ready before running the following command:
- Authorize ddev to utilize your SSH key pair
- Ensure that you have uploaded your public SSH key to GitHub@UMN (you can upload keys at https://github.umn.edu/settings/keys) before running the following command:
ddev auth ssh
- Ensure that you have uploaded your public SSH key to GitHub@UMN (you can upload keys at https://github.umn.edu/settings/keys) before running the following command:
- Change the PHP version to 8.1
ddev config --php-version 8.1ddev restart
- Build the platform code using the dependency manager for PHP, called composer, within the
your-sitedirectory- Ensure that you are at the top level of your site-name directory before running the following command:
ddev composer install
- Ensure that you are at the top level of your site-name directory before running the following command:
- Remove the
defaultfolder fromyour-site/docroot/sites/- It may be that the default folder does not appear in this directory. The default should not exist yet, so take no action if it does not appear.
rm -rf default
- It may be that the default folder does not appear in this directory. The default should not exist yet, so take no action if it does not appear.
- Clone your site-specific repo into a folder called:
default- This step will create a default site folder and allow you to sync all work to GitHub@UMN as you develop and test your site locally.
- Navigate into the
your-site/docroot/sites/directory before cloning - Be sure to keep the word "default" at the end of the following command:
git clone [email protected]:YOUR_ORG/YOUR_REPOSITORY.git default - Note: after cloning, you may want to check out your repo's development branch if you have one (given the nature of local development).
- From within the newly created 'default' folder, run
git checkout branchNameHereto change your branch to the appropriate branch. - You may need to run
git fetchwithin the folder before checking out a different branch.
- From within the newly created 'default' folder, run
- Reconfigure ddev to be a Drupal 9 or Drupal 10 project-type
- Important: Be sure to run this at the top level of your project folder (
your-site) not the in any level of your docroot or sites or default folders. - Start the configuration process:
- Drupal 9:
ddev config --project-type=drupal9
- Drupal 10:
ddev config --project-type=drupal10
- Drupal 9:
- Hit the Enter or Return key when prompted for:
- the Project Name
- the Docroot Location
- Note: Re-run this command any time you update ddev, then run
ddev restart
- Important: Be sure to run this at the top level of your project folder (
- Database setup (existing site or new site jump to appropriate sub-section of this step based on your need)
- Connect an existing Drupal database
- Note: When importing a database into an existing ddev site, be sure to drop the database first with:
ddev exec drush sql-drop - Import your site database:
ddev import-db --src=/path/to/your/database - Rebuild your site cache:
ddev exec drush cr - Uninstall modules that may cause conflicts in local development
- Drupal 9
ddev exec drush pm-uninstall -y simplesamlphp_auth memcache acquia_purge purge
- Drupal 10
ddev exec drush pm-uninstall -y samlauth memcache acquia_purge purge
- Drupal 9
- Note: When importing a database into an existing ddev site, be sure to drop the database first with:
- Set up a new database
- Use these steps if you do not yet have a Drupal development site, or if you want a fresh/new database built from the OIT Drupal platform
- Navigate to your local dev site in a web-browser of your choice using the ddev-provided local URL:
- e.g., your-site.ddev.local or your-site.ddev.site
- Select Install to initiate the Drupal installation process
- Configure the options as needed for your site on the "Select components to install on this site" prompt. For standard options, check/uncheck the following:
- Uncheck: "Install site with Acquia settings"
- Uncheck: "Install as a Drupal Lite Site"
- Check: "Install Lightning Workflow Components"
- Check: "Install Lightning Layout Components"
- Check: "Install Folwell Component Modules"
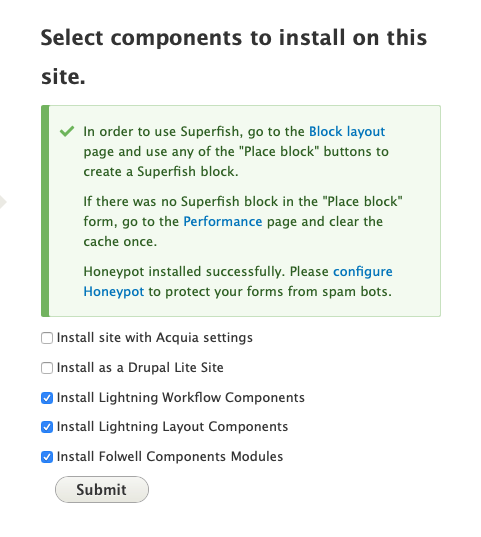
- Select Submit
- Navigate to your local dev site in a web-browser of your choice using the ddev-provided local URL:
- Use these steps if you do not yet have a Drupal development site, or if you want a fresh/new database built from the OIT Drupal platform
- Connect an existing Drupal database
- Configure the Stage File Proxy module
- Skip this section if you do not have a live dev, stage, or production Drupal site from which you can remotely source your files.
- This module will pull in files from your live Drupal dev site from which you sourced your database in the steps above.
- Run the following commands to set up Stage File Proxy:
ddev exec drush pm-enable -y stage_file_proxyddev exec drush cset -y stage_file_proxy.settings origin https://your-site.dev.umn.eduddev exec drush cset -y stage_file_proxy.settings origin_dir sites/your-site.umn.edu/files
- In Drupal Management, the listed alias for your dev site will be the
originURL similar in format tohttps://your-site.dev.umn.edu - The site domain within the
origin_dirargument (sites/your-site.umn.edu/files) will use the Primary URL (Site folder name) from your Drupal Management page. - Do not include the ".dev" subdomain in the origin_dir, but do consider sourcing your local files from the live dev URL rather than your production URL.
- In Drupal Management, the listed alias for your dev site will be the
- Change the Temporary directory:
ddev exec drush cset -y system.file path.temporary /tmp - Log in as an admin and reset your password:
ddev exec drush uli- This command will provide a one-time login URL that can be used to set the local account password for future local logins.
- You may use this command for all logins if you do not wish to set a local account password, but no SAML/SSO/UMN accounts will allow logins. The only login options are a local account or the
drush uli(user login) command.
- Setting up twig debugging and cache disabling:
- Edit the file
your-site/docroot/sites/development.services.ymland add the following code:parameters:
http.response.debug_cacheability_headers: true
twig.config:
debug: true
auto_reload: true
cache: false
services:
cache.backend.null:
class: Drupal\Core\Cache\NullBackendFactory
- Edit the file
your-site/docroot/sites/default/settings.phpto contain the following:$settings['container_yamls'][] = DRUPAL_ROOT . '/sites/development.services.yml';$settings['cache']['bins']['render'] = 'cache.backend.null';$settings['cache']['bins']['dynamic_page_cache'] = 'cache.backend.null';
- Edit the file
Additional Information
Drupal Enterprise 9 Admin Guide
Enable Folwell Theme and Modules on an existing Drupal 9 Site