
The Due Date Modifier gives you a central location to change all assignment, quiz, and discussion due dates for a new semester. You can also set Available From and Until dates for all of these activities.
You can easily verify or adjust assignment due dates using the Multi-Tool Due Date Modifier. This tool is part of Design Tools, developed by cidilabs to work within Canvas.
- Note: When you import a course, only assignment dates are updated during the import process.
- Note: Due Date Modifier will not work on assignments that have multiple Assign To options (for example, having different dates for different sections or individuals). You will need to manually set additional due dates within the assignment.
Cidilabs has a tutorial that demonstrates Adjusting Assignment Dates with Multi-Tool (video 2:44).
Turning on the Multi-Tool
If you do not see the Multi-Tool option in the left course navigation bar, you will need to turn it on in the Settings area to access the Due Date Modifier.
- Click Settings in the course navigation bar.
- Select the Navigation tab found across the top portion of the page.
- Scroll down to find the Multi-Tool option and click on the three dots to the right of the tool name. A short drop-down menu will appear.
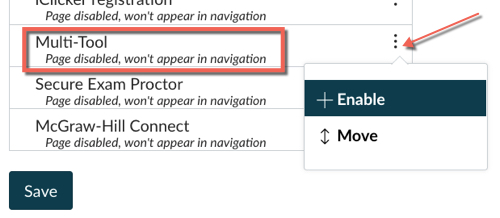
- Click Enable in the drop down menu. The Multi-Tool will move to the list of enabled tools at the top of the page.
- Scroll down to the bottom of the page and click Save.
You should now see Multi-Tool in the course navigation menu.
Using the Due Date Modifier
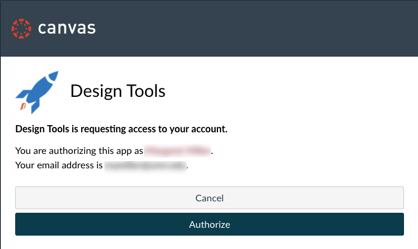
- Click Multi-Tool in the left-hand course navigation menu.
- Note: The first time you click Multi-Tool, a message will appear asking for permission for Design Tools to access your account. Click Authorize.
- Note: The first time you click Multi-Tool, a message will appear asking for permission for Design Tools to access your account. Click Authorize.
- Click Due Date Modifier.

- Select the new semester's Course Start and Course End dates.
- Click Update Course Dates.

- Click Set Blackout Dates (if needed) to open that area of the page. Blackout Dates can be used to identify holidays, breaks or any other dates when you do not want to have assignments due. The dates you select in this area will be grayed out on the calendar selection box in the Assignment Date section.
- Put your cursor into the Blackout Dates field. A calendar will appear for you to navigate through to find the dates you want to select.
- You must click on each date separately to select it for a Blackout Date.
- If you want to blackout specific days during every week of the semester (i.e. Saturdays and Sundays), check the boxes next to the days of the week under the Blackout Days list.
- The Blackout Dates and Days you select will be saved automatically.
- Scroll down to the Assignment Data section. The default list in the assignments area will include all quiz, assignments and forums you have created in the course.
- You can use the filters across the top of the list to change what is listed below. However, this default list shows all course activities at a glance.

- You can use the filters across the top of the list to change what is listed below. However, this default list shows all course activities at a glance.
- Click the Due Date field next to an assignment to open up a calendar to select the correct due date.
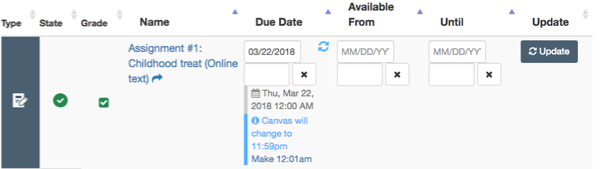
- Any dates you selected as Blackout Dates or Blackout Days above will be grayed out on the calendar and will be unable to be selected when choosing new due dates.
- Click into the box below the date box to set a specific time of day that the assignment is due if applicable. If left blank, Canvas will automatically set the time to 11:59 pm of that date.
- If applicable, set the Available From and Until dates as needed. Find out more information on Available From and Until dates here.
- Click the Update button in the far right of that activity's row to save your selections.
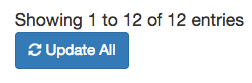
- You can change all activity due dates and select the Update All button at the end of the list. However, if you have a long list of assignments to set, you may want to click the Update button in each row to save your work as you go.
- Once you have set all dates appropriately, make sure the that you have saved your work by selecting the Update All button at the bottom of the page.
- To exit the Due Date Modifier, click on Home in the course navigation area.