When visitors to your website navigate to certain pages or request information via different options, Cases can be automatically created within CRM. Internal business processes will determine what kind of Cases are available for you to see and when you should be responding to different types of Cases.
This article will assist in navigating to areas where Cases can be found and lead to potential next steps. You may also find information on tips to Work with Case Queues helpful.
Managing Cases
- Click on the Cases Tab from your homepage if showing in your default tabs or click on the All Tabs (+) button and select Cases from the list.
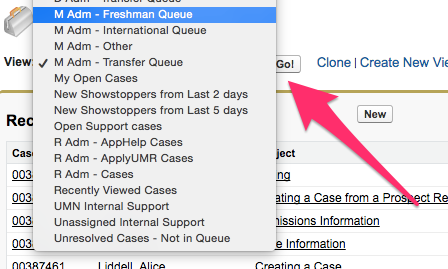
- Once on Cases Home, click the arrow next to the View: box to bring up a list of available options.
- This is where you may want to check with internal business processes to ensure that you are choosing the list which delivers the Case records that you are expected to manage.
- Once the correct choice on the dropdown is highlighted click Go! A list of available Cases is displayed.

- Once on the desired Queue View, there are several options that allow you to update records en masse if desired. Internal business processes will dictate when or how these options will be used:

- Clicking on New Case from this screen will create a New Case specifically for the View/Queue that is showing in the dropdown at the top of the screen.
- Clicking on Accept will assign any Cases that are checked off to the left of the Action column to your personal queue.
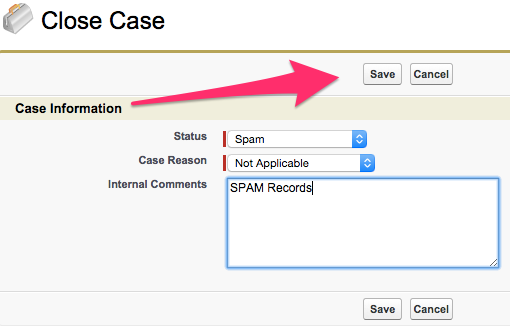
- Clicking on Close will bring up a Close Case screen for any Cases checked off to the left of the Action column.
- From this screen a Status, Case Reason, and Internal Comments field are able to be added to the Cases. Clicking on Save from this screen will finalize those changes.

- From this screen a Status, Case Reason, and Internal Comments field are able to be added to the Cases. Clicking on Save from this screen will finalize those changes.
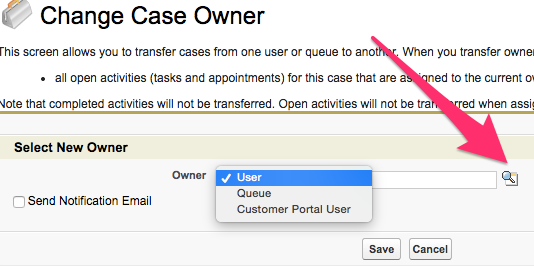
- Clicking on Change Owner allows you to change the owner of any Cases checked off to the left of the Action column.
- These Cases can be assigned to either a User or a different Queue from this screen using the Lookup icon.
- Checking off Send Notification Email will send the new Owner of the Case(s) an email notification once the changes have been saved.
- Clicking Save from this screen will change the Owner information and bring you back to the view you were looking at prior.

- Clicking on Change Status allows you to change the status of any Cases checked off to the left of the Action column.
- This brings you to a screen with a dropdown for selection of a New Status and a Save button.
- Clicking on Save from this screen after selecting a New Status will update any associated Case(s) and bring you back to the view you were looking at prior.
- Clicking on Mass Delete should be used with caution, as it will immediately delete any Cases checked off to the left of the Action column.
- Once any desired mass actions have been performed, actions on individual Cases can be taken. To add an activity, call log, attachment, or send an email click on the Case Number to be brought to the Case record screen where buttons to perform these actions can be found.

- To edit information for a particular Case record - such as Status, Case Origin, Priority, Type, Case reason, Contact or Prospect records, Subject, Description, or any Internal Comments - click on Edit to bring up the Case Edit screen.

