
When you use AppsToGo, you have many choices of where to save (or print) your work. These instructions will guide you through how to turn off the ability to save files to your computer's local hard drive.
Use these instructions if you want to prevent the accidental saving of files to your computer's local hard drive or printing from your computer's local printers when using AppsToGo. Following these instructions will not affect the ability to save to your mapped network drive (or your Google Drive if registered via kumo.oit.umn.edu). These instructions may be reversed at any time.
The first time you log on to AppsToGo, CitrixWorkspace (or Citrix Receiver) will display asking if you want to allow access to your local hard drive. The dialogue box will be similar to the one below.
Your choices will be:
- No access
- Read-only access
- Read/write access
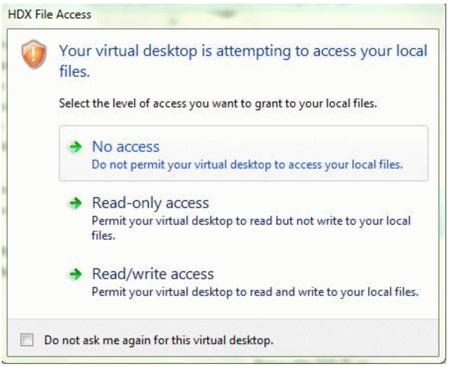
At this point you may choose what level of access you would like to allow.
You may disable your user-level account's access to your local hard drive at any time by modifying the preference within the Citrix Workspace (or Citrix Receiver) application. Changing access to local hard drives on the computer's system-level requires the manual modification of the .ini preference file for Citrix Workspace (or Citrix Receiver). For instructions, see below.
Note these things in regards to changing Citrix Workspace (or Citrix Receiver) preferences on Windows and Mac OS X:
- Changes take effect after quitting and relaunching Citrix Workspace (or Citrix Receiver).
- If you disable access to your local hard drive, your local hard drive may still show up in the sidebar of the application, however, you will receive an error message if you try to access it.
Disable access to client hard drive (MAC OS X)
- Open Citrix Workspace (or Citrix Receiver).
- In the application toolbar, select Citrix Workspace (or Citrix Receiver) and click on Preferences.
- Click on the File Access icon.
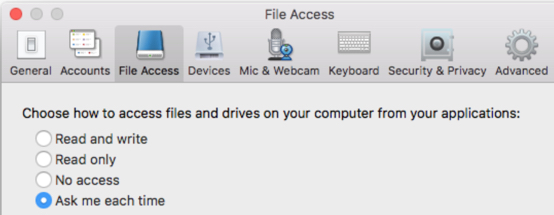
- Click the No access selection to disable access.
- Close the Citrix Workspace (or Citrix Receiver).
Disable access to the computer's local hard drive for one virtual app/desktop (Windows machine)
- Go to apps.umn.edu using a supported web browser (see the Self-Help Guide).
- Launch any AppsToGo application/desktop.
- Right-click on the Citrix Workspace (or Citrix Receiver) Icon
 in the Windows notification area at the bottom of your screen (you may have to unhide your notifications to see the Citrix Workspace (or Citrix Receiver) Icon).
 - Click Connection Center; click Preferences.
- Under the File Access tab, you will see some options to choose. To disable access until further notice, select No Access.
- Click Apply, and then click OK to close out of the preferences area.
- Click Close to get out of the Citrix Connection Center.
Note: For individual Windows Published desktops the drive settings are located in the Preferences Dialog and can be accessed via the toolbar at the top of the screen.
Disable access to Windows hard drives and printers on a Windows client computer for all virtual applications and/or desktops
NOTE: Disabling local client drive access globally requires manually editing the Citrix Workspace (or Citrix Receiver) configuration file on the client's computer. Therefore, these steps can only be followed on a device that you have admin access to (eg. not UMN managed devices).
- Log out of your AppsToGo session and quit Citrix Workspace (or Citrix Receiver).
- Search documents: appsrv.ini
- Click Search in File Explorer
- Find the APPSRV.INI file ( in %APPDATA%\ICACLIENT ).
- Run: notepad.exe %APPDATA%\ICACLIENT\APPSRV.INI
- In notepad, find these lines and change them all to off:
- COMAllowed=off
- CPMAllowed=off
- VSLAllowed=off
- CDMAllowed=off
- Click Save.
- Quit Notepad.
Definition of variables listed above:
- COMAllowed=on/off - set CLIENT COM Port mapping
- CPMAllowed=on/off - set CLIENT LPT Port mapping
- VSLAllowed=on/off - set CLIENT PRINTER mapping
- CDMAllowed=on/off - set CLIENT DRIVE mapping